Fastbind FotoMount F42 Album Binder
2495.00
NewCondition
InStock
Fastbind FotoMount F42 Album Binder


SWIPE FOR MORE IMAGES
- 0
- 1

Product Description
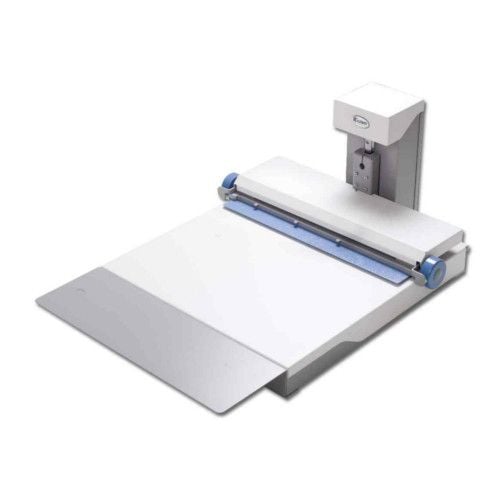
Fastbind FotoMount F42 is a manual large format photo album binding machine using the pioneering Fastbind Mountinglift system (patents pending). This machine is equipped with removable extension table to optimized ergonomical operation. With the extension table you produce albums up to 470 x 420 mm (18.5" x 16.5"), with all kind of printed materials (photographic paper, card, laminated materials, etc.) in a matter of minutes! Albums open flat with an edge-to-edge panoramic view on each page. With Fastbind FotoMount binders, you can make a versatile number of fully or partially personalized hard cover books up to 80 mm/3.15in (up to 110+ flat spreads) thick. All Fastbind supplies you need is a pair of FotoMount Binding End Sheets, one FotoMount Mounting Sheet per spread, Printable Tacking Sheet and the Custom Cover Materials to make a hard cover book. With Fastbind there is one solution for completely customized hard covers: Free formats using Fastbind Grey/Chip boards (compatible with Fastbind Casematic product line).
Product Details
- Flexibility and Quality. Using photographic paper, card, laminated material or any kind of print, you can produce any book format from 50 x 50 mm / 2" x 2" up to 470 x 420 mm / 18.5" x 16.5" and you achieve an edge-to-edge panoramic view on each page. The book cover can be either a standard cover or a digitally printed custom made cover. In a matter of minutes you can create a beautiful, professional photo album yourself, saving time and adding more profit to your bottom line.
- For Photographic Professionals and Digital Printers.The Fastbind FotoMount F42 is a superior solution, designed specifically with the photographic studio, photo lab and professional photographer in mind. It also perfectly meets the needs of digital printers, copy shops and on-demand publishers who can offer premium photo albums to their customers.
- Easy to Use and Economical.The Fastbind FotoMount™ product line provides all the supplies needed to mount a photo album . With only two types of supplies you can manage all album sizes (up to 470 x 420 mm / 18.5" x 16.5" and 60 mm / 2.4-inch-thick): Fastbind FotoMount mounting sheets form the core of the book block and Fastbind FotoMount end sheets attach your book block to the cover.
- On-demand photo album binder.
- Albums open flat - 180 degrees.
- Equipped with removable extension table - binds albums up to 470 x 420 mm (18.5" x 16.5").
- Manual operation (no electricity required).
- Equipped with removable Extension Table and Cover Guide.
- One content and two cover Positioning Holder Magnets are included.
Item Specifications
- Max print Size (W x L): 426 x 946 mm / 16.7 x 37.2"
- Min Album Size with extension table (W x L): 50 x 50 mm / 2 x 2"
- Max Album Size without extension table (W x L): 310 x 420 mm / 12.2 x 16.5"
- Max Binding Thickness: 60 mm / 2.4"
- Machine Dimensions with extension table (W x L x H): 540 x 790 x 320 mm / 21.2 x 31.1 x 12.6"
- Machine Dimensions without extension table (W x L x H): 540 x 610 x 320 mm / 21.2 x 24.0 x 12.6"
- Package Dimensions (W x L x H): 586 x 700 x 406 mm / 23.1 x 27.6 x 16.0"
- Manufacturer's Warranty: 1 Year On All Parts
- Net/Gross Weight: 21/24 kg / 46/53 lbs.
- Part Number: FBF42
Demonstration Video
Making a Photobook - Fastbind FotoMount F42
Transcript:
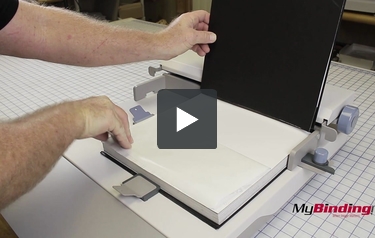
In this video we will be using the Fotomount F42 to create a professional photobook.
To begin, grab an end sheet. The end sheets are all marked with a circle on the release liner. When you peal the liner off, make sure to orientate the arrows toward you.
Place the end sheet to the farthest notch on the left, but first peel the release liner off. There is a strip of paper with no tacking glue, place your magnets here to secure the project in place.
Next, grab the ends of the guide, bring it away from the project, over, and back out.
Take your first page and align it with the head to ... Read More
In this video we will be using the Fotomount F42 to create a professional photobook.
To begin, grab an end sheet. The end sheets are all marked with a circle on the release liner. When you peal the liner off, make sure to orientate the arrows toward you.
Place the end sheet to the farthest notch on the left, but first peel the release liner off. There is a strip of paper with no tacking glue, place your magnets here to secure the project in place.
Next, grab the ends of the guide, bring it away from the project, over, and back out.
Take your first page and align it with the head to the left. That is, the top of every page should be on the left side. Align all your prints to the smaller guide edge.
Place the sheet, then push the guide out, press the page and bring the guide back over the project.
Next, take a tacking sheet. These sheets will not have a circle. Orientate the sheet with the arrows pointing toward you and remove the liner. Place the tacking sheet to the farthest edge guide. Push the clamp out and remove the top liner, then bring the guide back down.
Place on your next sheet with the head to the left. Again, use the inner guide to place your pages against the guide.
Continue placing on your tacking sheets and pages. Tacking sheet arrows should always point toward you, and align to the left notch. Your photo pages align to the smaller notch, slightly overlapping the tacking sheet edges.
When all your pages are in the project, finish with another end sheet. Again, this is labeled with circles. Align this to the farthest left notch.
Remove the project from the machine and take it to a stack cutter. Trim the three edges, excluding the binding spine.
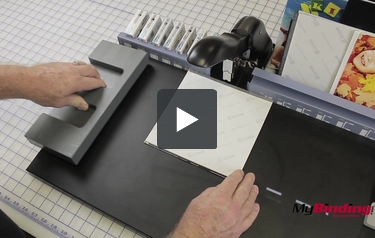
With our pages ready, we will now bind them to our custom hardcover.
First, raise the guide and place the mounting attachment underneath. Use the guide to hold this attachment in place.
Now place your cover on with the spine to the back against the attachment and against the side guide.
Place your pages in, against the spine of the cover. Then center the pages to the cover, and adjust the guide to keep them in place.
Take the first magnet guide and place it against the cover opposite the attachment guide. Place the second guide with the lip to push the pages against the spine of the cover. Confirm that your edges are even.
Now, peel back half of the release liner of your end sheet. Place the cover on, making sure to align the cover corners.
Remove the guides, and flip the project around. Align your guides once more. With our pages centered still, peel back the next liner half way. Align your cover corners and press the cover down. Remove the project from the machine.
As a final step, reach in and pull out the liners. Push the covers down, and your project is complete.
You have now create your very own photo book using the Fastbind Fotomount F42.
To begin, grab an end sheet. The end sheets are all marked with a circle on the release liner. When you peal the liner off, make sure to orientate the arrows toward you.
Place the end sheet to the farthest notch on the left, but first peel the release liner off. There is a strip of paper with no tacking glue, place your magnets here to secure the project in place.
Next, grab the ends of the guide, bring it away from the project, over, and back out.
Take your first page and align it with the head to the left. That is, the top of every page should be on the left side. Align all your prints to the smaller guide edge.
Place the sheet, then push the guide out, press the page and bring the guide back over the project.
Next, take a tacking sheet. These sheets will not have a circle. Orientate the sheet with the arrows pointing toward you and remove the liner. Place the tacking sheet to the farthest edge guide. Push the clamp out and remove the top liner, then bring the guide back down.
Place on your next sheet with the head to the left. Again, use the inner guide to place your pages against the guide.
Continue placing on your tacking sheets and pages. Tacking sheet arrows should always point toward you, and align to the left notch. Your photo pages align to the smaller notch, slightly overlapping the tacking sheet edges.
When all your pages are in the project, finish with another end sheet. Again, this is labeled with circles. Align this to the farthest left notch.
Remove the project from the machine and take it to a stack cutter. Trim the three edges, excluding the binding spine.
With our pages ready, we will now bind them to our custom hardcover.
First, raise the guide and place the mounting attachment underneath. Use the guide to hold this attachment in place.
Now place your cover on with the spine to the back against the attachment and against the side guide.
Place your pages in, against the spine of the cover. Then center the pages to the cover, and adjust the guide to keep them in place.
Take the first magnet guide and place it against the cover opposite the attachment guide. Place the second guide with the lip to push the pages against the spine of the cover. Confirm that your edges are even.
Now, peel back half of the release liner of your end sheet. Place the cover on, making sure to align the cover corners.
Remove the guides, and flip the project around. Align your guides once more. With our pages centered still, peel back the next liner half way. Align your cover corners and press the cover down. Remove the project from the machine.
As a final step, reach in and pull out the liners. Push the covers down, and your project is complete.
You have now create your very own photo book using the Fastbind Fotomount F42.
Binding a Hardcover Book - BooXTer Zero Max
Transcript:
This is the Fastbind Booxter Zero Max!
To start, take your pages and place on a
Booxter end sheet. Make sure the soft end is where your spine will be. Align both sides.
Next, use the guides to choose the correct size staple. You want to use the smallest size possible for your project. Select the proper size staple.
Push on the back button to release the staple tray and insert your staples. Push the tray back into place.
Next, use the edge guide and ensure all your pages are aligned. When aligned, center the project with the stapler and make the first staple. Make sure to press dow ... Read More
This is the Fastbind Booxter Zero Max!
To start, take your pages and place on a Booxter end sheet. Make sure the soft end is where your spine will be. Align both sides.
Next, use the guides to choose the correct size staple. You want to use the smallest size possible for your project. Select the proper size staple.
Push on the back button to release the staple tray and insert your staples. Push the tray back into place.
Next, use the edge guide and ensure all your pages are aligned. When aligned, center the project with the stapler and make the first staple. Make sure to press down all the way.
With your first staple in, slide the project to the next staple guide on the surface. Make your next staple, then slide the project to the next guide and continue to staple. Use the same method with the other side. Your pages are now held securely together.
With stapling complete, place the plastic bar against the side--this will help the cover lean back and stay open. Then use the first magnet to align the cover. Place your pages in. Use the second magnet to hold the pages in place. Now, center the pages to the cover.
With it centered, peel back half of the release liner of the first end sheet. Now, bring down your cover, but make sure to align the corners together before pressing it on. Press it down, then flip the book over and repeat.
Use the guides once more, peel back the liner, align the corners, and press the board to the end sheet.
Next, reach into the book and peel the release liners completely out.
As a final step, lay the cover flat onto the machine and rub the end sheets smooth to ensure they have tacked completely to the cover.
You now have a complete hardcover project using the Booxter Zero Max.