
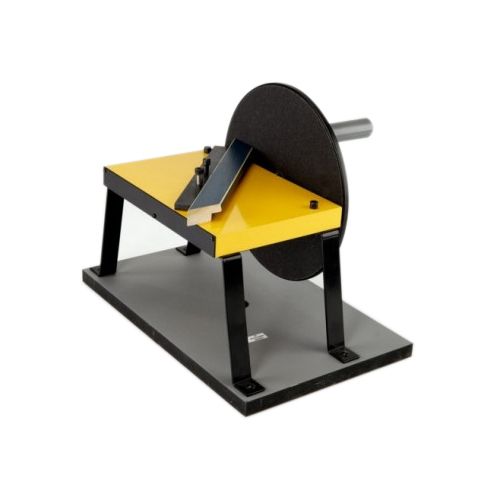
Logan F200-2 10" Precision Sander Elite
143.99
NewCondition
OutOfStock
We're sorry, but we no longer offer this item.
Call us at 1-800-944-4573 for personalized recommendations
or check out these similar items that may be a good fit:
-

Logan F60 Picture Framing Dust Cover Trimmer
$15.83
- Uses Logan blade #270.
- Used either left or right handed.
- Features a safety blade cover when not in use.
- Precisely trim the paper approximately 3/16" (5mm) from the outside edge.
Logan F200-2 10" Precision Sander Elite


SWIPE FOR MORE IMAGES
- 0
- 1
- 2

Product Description
The F200-2 Precision Sander Elite features a 10" (25cm) sanding wheel to accept up to 3-1/2" (9cm) wide moulding. The Precision Sander Elite sands miter cuts to perfect 45 degree angles both vertically and horizontally for perfect corners with no gaps. Includes squaring and disk cleaning tools. Uses Logan F50 sanding disk (80 grit). The Logan Precision Sander Elite is used to correct the incorrectness of saws to see that each miter cut is sanded to a perfect 45 degree angle vertically and horizontally. The Precision Sander is crucial to getting tight miter joints with no gaps and is a must have when cutting wood moulding into frames using any type of manual or electric saw.
Product Details
- Features a 10" (25.4cm) sanding wheel.
- Moulding profile capacity up to 3 1/2" (8.9cm).
- Includes balanced wheel with sanding disk.
- Sturdy base plate and adjustable micro-stops.
- Use Logan replacement Sanding Disk Model F50.
Demonstration Video
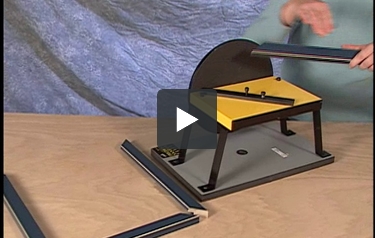
F200-2 Precision Frame Sander
Transcript:
The contents of the PrecisionSander are the sander base, the sanding wheel, 2 Allen wrenches, a disc cleaning tool, the adjustment triangle, and the instruction manual. To assemble the PrecisionSander lead, first remove the sanding wheel from the base of the sander. The pieces shown here are used for packing only and can be discarded. To install the sanding wheel, place it on the side of the sanding base, insert the bolt, and tighten with the Allen wrench provided. Now you are ready to sand your moulding. To sand the mitered cuts on the ends of moulding, insert the piece of moulding into ...
Read More
The contents of the PrecisionSander are the sander base, the sanding wheel, 2 Allen wrenches, a disc cleaning tool, the adjustment triangle, and the instruction manual. To assemble the PrecisionSander lead, first remove the sanding wheel from the base of the sander. The pieces shown here are used for packing only and can be discarded. To install the sanding wheel, place it on the side of the sanding base, insert the bolt, and tighten with the Allen wrench provided. Now you are ready to sand your moulding. To sand the mitered cuts on the ends of moulding, insert the piece of moulding into the sander with the top side up. To prevent any splintering, always see that you are rotating the wheel into the face of the moulding. To sand the other end of the moulding, rotate the sanding bar around, place the mitered cut into the wheel, and again sand into the face of the moulding to prevent splintering. You are now ready to join your frame. To match each of the 4 sides of the moulding, place the short sides back to back and check the ends to see that they are even. If there are any differences in length, place the piece back into the sander to make minor adjustments. To adjust the squareness of the sander, use the triangle adjustment tool. It should fit tightly into the machine. If any adjustments are needed, use the Allen wrench provided to make minor adjustments on the sanding bar. Periodically, the sanding wheel needs to be cleaned. Do this by using the sanding disc cleaning tool.
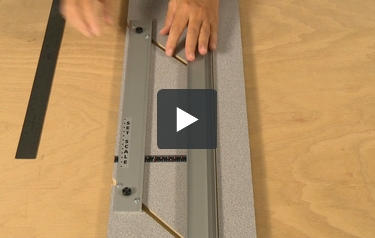
How to Re-Parallel a Mat Guide
Transcript:
If you find that the boarders on the mat you are cutting are tapering from big to small as shown in the example here, you may need to reparallel the mat guide on your mat cutter. It is important that the parallel mat guide is perfectly parallel with the guide rail in order to have perfectly consistent boarders. To reparallel the mat guide, first loosen the black knobs with your fingers. Then using a Philip screwdriver, loosen the 4 Philip screw heads on either sides of the black knobs. At this point, the parallel mat guide will be loose. Place a suitable straight edge between the parallel ...
Read More
If you find that the boarders on the mat you are cutting are tapering from big to small as shown in the example here, you may need to reparallel the mat guide on your mat cutter. It is important that the parallel mat guide is perfectly parallel with the guide rail in order to have perfectly consistent boarders. To reparallel the mat guide, first loosen the black knobs with your fingers. Then using a Philip screwdriver, loosen the 4 Philip screw heads on either sides of the black knobs. At this point, the parallel mat guide will be loose. Place a suitable straight edge between the parallel mat guide and the guide rail. Slide everything together and hold them tightly with one hand while with your other hand, retighten the black knobs first. Then use the Philip screwdriver to retighten the 4 screws. You may now loosen the parallel mat guide and remove the straight edge. And the mat guide is now reparalleled.
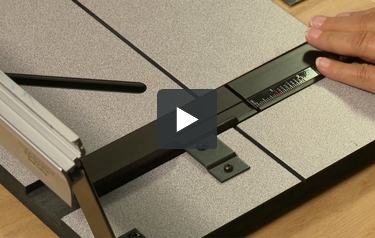
How to Resquare a Squaring Arm
Transcript:
When using a machine with squaring arm, it’s important to see that the guide rail and the squaring arm itself form a perfect 90 degree angle. To check this, use an L-shaped carpenter square. Place it into the corner of the machine to check for any gaps or movement. In this example, it shows that the squaring arm needs to be adjusted. To adjust the squareness of the squaring arm, first loosen the screw on the squaring arm clip and remove the squaring arm from the machine. Find the 2 adjustment screws down in the board slot. In this example, the screw on the right needs to be turned in sli ...
Read More
When using a machine with squaring arm, it’s important to see that the guide rail and the squaring arm itself form a perfect 90 degree angle. To check this, use an L-shaped carpenter square. Place it into the corner of the machine to check for any gaps or movement. In this example, it shows that the squaring arm needs to be adjusted. To adjust the squareness of the squaring arm, first loosen the screw on the squaring arm clip and remove the squaring arm from the machine. Find the 2 adjustment screws down in the board slot. In this example, the screw on the right needs to be turned in slightly. And then the screw on the left needs to be turned out the same distance. Then replace the squaring arm into the machine. Then recheck the square using the L-shaped carpenter square to see if further adjustments are necessary.


