We're sorry, but we no longer offer this item.
Call us at 1-800-944-4573 for personalized recommendations
or check out these similar items that may be a good fit:
-
Fastback 9 Strip/Tape Binding Machine - FB9
$2,825.00
- 3.5 times faster than traditional punch-and-bind systems
- Binds both soft and hardcover books
- 250 sheet binding capacity
- 1 year manufacturer warranty
-
Fastback 20 Strip/Tape Binding Machine - FB20
$5,175.00
- Graphical user interface with minimal training required
- Strip, hardcover and perfect binding
- 350 sheet binding capacity
- 1 year manufacturer warranty
-
Fastback Image Wrapper Hardcover Maker - PPImageWrapper
$1,750.00
- Produce customized hard covers without messy glues, or heavy, expensive equipment.
- Dimensions: 23" x 32" x 3.25" (D x W x H)
- Maximum Material Thickness: 0.02" (at least 20 pt)
- Maximum Warparound Cover Size: 13" x 29.5" (33 cm x 75 cm)
-
Fastback Scoring/Creasing Machine - PPSM
$2,050.00
- Interchangeable dies let you choose between single and double scores
- Patented Centering Guide eliminates any guesswork from the process
- Maximum Book Thickness: 350 pages
- 6 month manufacturer warranty
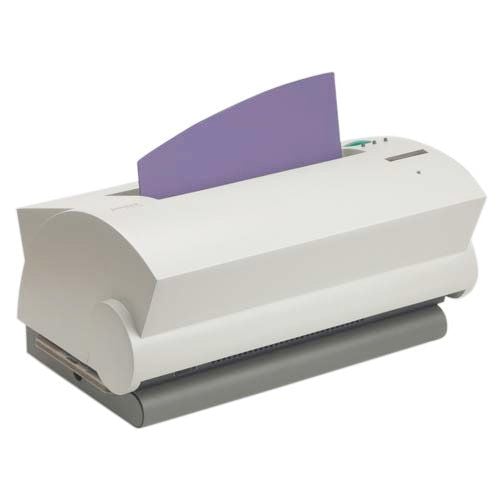
Powis Parker Fastback Splitter


- 0
- 1

Product Description
Product Details
- Prepares coated paper for binding without sewing or stitching
- Handles paper with full edge-to-edge bleeds
- User-friendly and safe operation
- Automatic paper jogging feature providing an even layout
- Clean environment with the filter system by eliminating paper dust
Item Specifications
- Spine Lengths: Max. 12" (30.38cm) or A4; Min. 6" (15.24cm)
- Split Thickness: Max. 0.5" (1.27cm); Min. 10 sheets
- Page Sizes: Max. 12" x 12" (30.48cm x 30.48cm); Min. 6" x 6" (15.24cm x 15.24cm)
- Optimal Paper Weight: 110# Coated Text (Max. 215 gsm)
- Cycle Time: 35 Seconds (Warm-up Time <15 seconds)
- Power Requirements: USA: 115VAC, 60 Hz, 2.5 amps
- Regulatory Approvals: CE, TUV/T-mark, CTUVU
- Model: S41
- Machine Dimensions: 20.5" x 14.5" x 16.5" (W x H x D)
- Max. Weight: 65 lbs (29.5 kg)
Demonstration Video
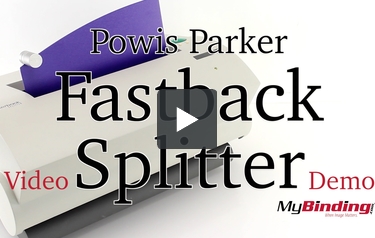
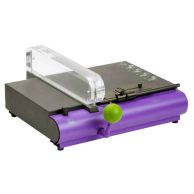
This is why we have the Powis Parker Fastback Splitter!
It is a very simple machine to use.
There are only five different settings to adjust in order to get the perfect ruffled edges. To select one, push the big green button, choose the setting and push the button again to save it.
Next place in yo ... Read More
The problem with glossy paper is that it doesn’t adhere well to glue, which is a problem when you’re using a Fastback machine or any other thermal binding machine. What’s needed is something to expose the paper fibers underneath the gloss so the glue can seep in and hold tight.
This is why we have the Powis Parker Fastback Splitter!
It is a very simple machine to use.
There are only five different settings to adjust in order to get the perfect ruffled edges. To select one, push the big green button, choose the setting and push the button again to save it.
Next place in your pages when the system says “ready”, push the green button and it will split the edge of your project. It also has a pre-jog feature to make sure the pages are laying flat when the machine clamps down—of course you can turn this off too. This is a real time example, it takes about 15 seconds to complete a cycle.
This is what unspilt paper looks like—and here is the split side. Also keep in mind that for this demo I am only using normal printer paper, but it makes a point still.
So now whether you are using Fastback’s unique glue strips, or even any other thermal binding covers, your glossy pages will hold like any other.
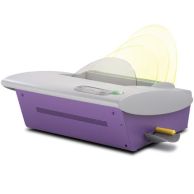
At the bottom of the machine is a filter to catch all of the fine dust created by the splitting process. Keep an out on this from time to time for when it will need to be replaced.
And at the top is a metal cylinder. This is an edge guide to keep your pages from moving around during the jogging process. It is adjustable for smaller sized projects. You can see that without it, the pages shift around and separate, which is not preferred for the splitting process.
Staff Review
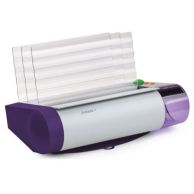
An Introduction to the Powis Parker Fastback S41 Edge Splitter
The new Fastback S41 edge splitter uses a new revolutionary method to prepare difficult-to-bind papers, so that virtually any document can be bound, even if it is printed on the most bind-resistant, coated paper. Unlike other equipment used to prepare papers for binding, the Fastback Splitter generates very little paper dust, and can be used on the desktop in any type of office or shop. This article will not only provide a brief introduction to the Powis Parker Fastback edge splitter but will also answer the question: Why use an edge splitter?
Why Use The Fastback S41 Splitter?
The Fastback binding system creates a very strong thermal adhesive bind. With most papers, this bind by itself is more than strong enough to hold the pages in, but there are a rew papers that will not bind well, no matter how strong the adhesive that binds the pages is. This is because these papers have coatings that keep adhesive from attaching to the paper fibers. When this happens, the adhesive must attach to the coating on the paper. Unfortunately, the coating is easily pulled away from paper, making for a very weak bind.
Over the years, there have been many different attempts to solve this problem. Most of them have been only partially successful. The two most common solutions are roughing and notching. With roughing, the edge of the book block is ground away to expose more of the paper fibers. This is a moderately effective method, but it creates a lot of paper dust. With notching, the book block is not ground down, but small notches are cut into the sheets, effectively increasing the edge surface. This method is less messy than roughing, but it is also less effective. Both methods damage the print area and leave marks that are visible in the finished book.
The Fastback Splitter uses a completely new method of preparing paper. Unlike roughing and notching, the Splitter creates a channel in the center of each sheet. This channel allows the adhesive to attach itself to the paper fibers in the center of each sheet, which means that it no longer matters if the paper is coated. The paper will stay firmly bound without damaging the print area. The result is a beautiful, signature-like finished product.
The Fastback S41 edge splitter was developed by Powis Parker to work as part of the Fastback Photocell. The Photocell includes the edge splitter and the FastBack 25 binding machine. This solution is designed specifically for mid to high volume production environments that need to create and bind photobooks using coated and hard to bind papers. This system is used in conjunction with the Powis line of photobook hard cover cases, headbands and endleaves. The result is one of the highest quality and most beautiful photobook solutions that is available on the market today. For this reason, several of the largest manufacturers of Photobooks in the USA use the Photocell and the S41 edge splitter. However, the edge splitter can also be used in full bleed applications and for binding brochures, documents and digital output that is bound on hard-to-bind paper stocks.
Helpful Tips
Hints For Better Results With a Fastback Splitter
Unlike previous technology, the Fastback Splitter does not rough or notch the bind edge of the paper. The microknives hit each page in parallel, splitting open the edge of the paper and allowing the adhesive to penetrate into the raw fibers inside each sheet of paper. This creates a firm anchor for each page to flex around, much like the roots of a tree. This is a completely new method of paper preparation, and requires some additional application knowledge in order to optimize the binding quality results.Paper Selection and Characteristics1. The effectiveness of the Splitter is dependent on paper type; weight, finish coat, grain, etc. Even the same weight paper (i.e. 110# Text) from different manufacturers will respond differently.
2. Paper grain direction is a critical consideration for any binding. The paper grain should be parallel with the bind edge (i.e. grain short in a landscape book) to allow the pages to bend easily without fighting the bind. This is especially important with heavier coated papers.
3. Prior to production, we recommend making several printed sample test books using different Splitter settings to determine the optimal settings.
Splitter settings
1. The Normal splitter settings have been optimized for glossy coated paper in the 140-180 gsm range (100-110# Text Gloss)
2. If the Splitter settings are incorrect, the edge splitting, which is required to allow the adhesive to penetrate into the page, will fray the edge and can actually interfere with the binding..
3. Splitter settings are Depth, Rate, Pass, Jogging and Compression.
4. Pass, Jogging and Compression settings do not directly influence edge split quality and should not be changed unless you are using a paper that doesn’t require much splitting and needs a faster cycle time.
5. Depth settings adjust how far the blades penetrate into the edge of the paper. The Normal setting works for most coated papers. The Light setting can be used for paper that just needs some light splits for added pull strength. We have yet to recommend a paper that needs the Deep setting.
6. Rate settings adjust how many times the blades hit each page. There are three available rate settings: Coarse, Normal and Fine. The Normal setting works for most coated papers. With the Coarse setting, the Splitter moves more quickly over the pages, so each page receives fewer hits. This is important for thicker paper (i.e. 60# cover) and easy to split paper, to reduce the potential edge damage. We have yet to recommend a paper that needs the Fine setting since it typically damages the split edges.
Evaluating Split Results
1. Ideal: The pages are visibly split in a smooth pattern with no large stripes or missed areas. The first and last pages are not dramatically folded over or damaged.
2. Too Light: Pages that are not split deep enough or have unsplit areas may not allow the penetration of the adhesive into the page. This is observed as smooth page edges or gaps in the split when removed from the Splitter. Light splitting results in pages lightly bonded-they may look acceptable, but might pull out with slight tugging. Typically several pages come out of the bind.
3. Too Deep: Splits that are too deep cause the end of the pages to be crushed, damaged and folded over. This sometimes causes the pages to ‘hang up’ on each other in the binder which blocks the glue from penetrating each page. The results are a poor quality bind-typically a single page that is not attached at all or the first and last pages folded over and stuck to the endleaves.
Operation Hints:
1. While the Splitter is jogging, keep your finger on top of the paper with light pressure until the green start button is pushed, the jogging stops and the book block is clamped. This prevents pages from bouncing up during the jogging operation and being clamped at an angle where they cannot be split.
2. If the split fades (becomes lighter) from Right to Left on the book, either there is not the proper gap to the paper stop or the book block was pushed and held at an angle during the clamping. Any small angle will affect the depth of the split. The blades are aligned for the paper edge to be exactly perpendicular with the clamp.
3. If there is a straight unsplit band (front to back) on the split edge, open the splitter and check for broken teeth. Replace blade as needed. Contact technical support.
4. If there is a broad unsplit band from Right to Left without a sharp edge, check the straightness of the paper edge against a flat surface. Any curve, typically in the center, is an indication of a dull guillotine cutting blade and requires the paper to be recut so the edge is flat. This problem typically does not occur when splitting the mill cut edge of paper and can be confirmed using uncut paper from a ream.
5. Adding the endleaves to the book block prior to splitting is acceptable provided the endleaf paper is heavy enough that the Splitter does not cut through the folded edge.