Fastbind PUREVA XT Perfect Binder
10995.00
NewCondition
InStock
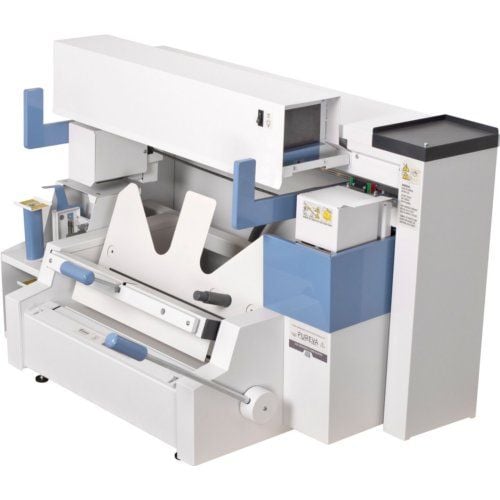
Fastbind PUREVA XT Perfect Binder


SWIPE FOR MORE IMAGES
- 0
- 1
- 2
- 3
- 4

Product Description
This Fastbind PUREVA XT Perfect Binder is a one complete system for hard and soft cover book binding and casing-in using either PUR or EVA hot melt. This versatile PUREVA XT can meet all of your perfect binding needs at very reasonable price. Featured with integrated casing-in system, this perfect binder produces both soft and hard cover books in a variety of sizes and thickness. It also introduces a new interchangeable glue cartridge that allows you to easily change between PUR & EVA glues. The new PGO Microcut roughener & hot melt applicator improves the binding strength over other competing technologies. The PUREVA XT’s innovative glue mechanism is easily changed thanks to economical glue cartridges, making it possible to change from PUR to EVA hot melt glue in seconds. Plus, it has an electronic adjustable temperature control with single button operation for switching between glue types. An innovative paper grain roughening system and support for up to SRA3 size books, makes the PUREVA XT the perfect choice for short & medium binding jobs.
Product Details
- PUR & EVA Hot Melt binding in one machine.
- Produces hard and soft cover books in a variety of sizes and thickness.
- New dust free PGO Microcut spine roughening.
- Easy to use and low maintenance.
- Interchangable glue cartridges that allows you to easily change between PUR & EVA glues.
- Electronic adjustable temperature control with single button operation for switching between glue types
- Innovative paper grain roughening system and support for up to SRA3 size books
- Compatible with: Fastbind Case Makers, Fastbind Creasers, Fastbind Presso.
Item Specifications
- Production Speed: 1-3 books per minute
- Min/Max Binding Thickness: 0.1- 45 mm / 0.1-1.9 inches
- Max. Binding Length: Up to 455 mm / 17.9 inches
- Min/Max. Binding Height: 140 / 320 mm / 5.5-12.5 inches
- Max Soft Cover Thickness: Up to 400 g/m²
- Voltage (V) / Frequency (Hz): 220- 240 / 50- 60
- Max. Current: 3.8 A
- Machine Dimensions (W x D x H): 1070 x 600 x 640 mm / 42 x 23 x 25 inches
- Weight: 90 kg / 198 lbs
- Approvals: CE
- Manufacturer's Warranty: 1 Year On All Parts (Must use the approved Fastbind glue (type 5.2 from Fastbind) or it will void the warrantee on the glue pot.)
Demonstration Video
Making a Hardcover Book - Fastbind PUREVA XT
Transcript:
This is the Fastbind PUREVA XT Perfect Binder.
Before we make a hardcover, make sure the machine is on, and the proper glue type is selected. When the light stops flashing, you are ready to bind.
Make sure you have the hardcover attachments in place. Each is labeled with a "H."
To start, insert your hardcover with the front facing the back of the machine. Make sure the spine is flat to the bottom.
Then, slide the cover to the guide, pull the hardcover guide so it overlaps the cover's edge.
Prepare your pages by placing on the end sheets. Make sure the exposed paper is on the bin ... Read More
This is the Fastbind PUREVA XT Perfect Binder.
Before we make a hardcover, make sure the machine is on, and the proper glue type is selected. When the light stops flashing, you are ready to bind.
Make sure you have the hardcover attachments in place. Each is labeled with a "H."
To start, insert your hardcover with the front facing the back of the machine. Make sure the spine is flat to the bottom.
Then, slide the cover to the guide, pull the hardcover guide so it overlaps the cover's edge.
Prepare your pages by placing on the end sheets. Make sure the exposed paper is on the binding edge. Place an end sheet on both sides.
Again, make sure the spine is flat--then place your pages in, confirming they are properly oriented to the cover. Tamp the ends evenly.
When clamping, place one hand behind the cover, holding it to the metal back, then bring the clamp in and secure it in place.
Now, flip the project around using the side arm. Run the splitter teeth across the project twice. This takes smooth paper and roughens it for the best glue penetration--This is required for non-bond papers.
Next, run the glue over the project. Give a short pause, then run it over again. Immediately press the cover over the glue and bring it back down three times--this spreads the glue evenly. Hold the cover to the spine for several seconds, pushing down.
With the glue drying quickly, bring the project back down, remove the clamp, and slide the project out. Then reinsert the entire book, spine down.
Then, press firmly down on the lever to crimp the spine of the book. Rotate the book and crimp the other side.
To finish your book, open it and peel back half of the release liner. Press the cover on and slide the liner out. Use the liner to cleanly rub the end sheet onto the cover. Repeat this on the other side. Peel off half, close the cover, and remove the liner. Press the end sheet to the cover, and then your project is complete.
You have now bound your hard cover book using the PUREVA XT. In this example we used EVA glue, and now the book is immediately ready to use.
Making a Softcover Book - Fastbind PUREVA XT
Transcript:
We are now going to make a softcover book using the Fastbind PUREVA XT Perfect Binder.
Before we make a soft cover, make sure the machine is on, and the proper glue type is selected. When the light stops flashing, you are ready to bind.
Make sure you have the soft cover attachments in place. Each is labeled with a "S."
To start, take your crimped soft cover and insert it into the machine. The front should be facing the back of the machine.
Next, insert your pages so they are properly oriented to the cover. Align all the pages together.
Now, place your hand behind your pages and ... Read More
We are now going to make a softcover book using the Fastbind PUREVA XT Perfect Binder.
Before we make a soft cover, make sure the machine is on, and the proper glue type is selected. When the light stops flashing, you are ready to bind.
Make sure you have the soft cover attachments in place. Each is labeled with a "S."
To start, take your crimped soft cover and insert it into the machine. The front should be facing the back of the machine.
Next, insert your pages so they are properly oriented to the cover. Align all the pages together.
Now, place your hand behind your pages and hold it to the machine, then bring the clamp down and secure it in place.
Use the lever arm to bring the project up, and press the cover down to keep it from improperly gluing.
Run the splitter teeth across the project twice. This takes smooth paper and roughen it for the best glue penetration--this is required for non-bond papers to expose the paper fibers.
Next, run the glue over the project. Give a short pause, then run it over again. Immediately after, pull lightly on the cover three times.
Then, bring the book down. Press the lever arm firmly down to clamp the spine. Hold this position for five seconds and release.
Unclamp the book. And remove the project.
You have now created a softcover book. For the best results, finish it off by trimming the three sides in a stack cutter. Using EVA glue, it is immediately dry and ready to use.
Fastbind PUREVA XT Features and Glue Changing
Transcript:
This is the PUREVA XT Features, and how to change the glue pots.
First, there is a on board light to light your projects.
The PUREVA XT can use both permanent PUR glue, and EVA glue for simpler projects.
With the splitting roller, you can use any type of paper--bond or non-bond.
The tray to hold your glue pots and holders can be easily placed.
There is a spot to catch any dripping glue.
And the bottom feet are adjustable to keep your machine sturdy.
To change between glue pots, first remove the covers. Then, grab the glue pot holder. Slide it into place, so both the top la ... Read More
This is the PUREVA XT Features, and how to change the glue pots.
First, there is a on board light to light your projects.
The PUREVA XT can use both permanent PUR glue, and EVA glue for simpler projects.
With the splitting roller, you can use any type of paper--bond or non-bond.
The tray to hold your glue pots and holders can be easily placed.
There is a spot to catch any dripping glue.
And the bottom feet are adjustable to keep your machine sturdy.
To change between glue pots, first remove the covers. Then, grab the glue pot holder. Slide it into place, so both the top latch and the side safety latch attach to the pot. Give it a tug, until the pot releases and catches on the safety latch. Remove the side latch to pull the pot out.
Each pot is labeled with the type of glue that should be put in it.
Next, slide the appropriate glue pot into place, pushing it all the way into place.
You may find that the roller is out of alignment and will not secure to the machine. To align this, move the glue pot slider back and forth, watching the connection point. When it is align, push it into place.
Next put in the correct glue. If using PUR glue, first open the side ventilation to collect the fumes produced by the glue. Then pour in your glue. Close the vent and cover the glue pot. And reassemble the covers.
On the left is your ventilation hose input. You can purchase an acceptable air purifier, or use a separate ventilation system.
When gluing PUR projects, the top vents take in the fumes from the exposed glue and remove it from the work area.
When finished with your run of PUR books, it is necessary to remove all the glue to keep the roller from gluing tight. With a stack of scratch paper in place, run the the remaining glue over chipboard until the machine rolls dry. Now take a small amount of EVA Glue and put it into your PUR pot. Allow this to warm, then roll the EVA glue down until the roller is completely covered. This will remove any residual permanent PUR glue, and shield the roller in when not in use.