We're sorry, but we no longer offer this item.
Call us at 1-800-944-4573 for personalized recommendations
or check out these similar items that may be a good fit:
-
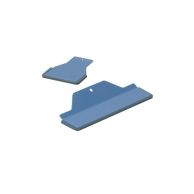
Fastbind Side and Back Guide for Casematic
$249.00
- Easier positioning of opaque materials.
- Ergonomic design.
- Makes the registration of any material that is solid.
- Help the operator line up the cover and boards.
-
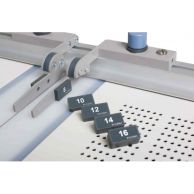
Fastbind Quick Change Spine Spacers
$195.00
- Can make any book cover or case imaginable.
- Compatible with casematic "H or L" series case makers
- Also make CD cases, custom printed hard covers, restaurant menus, 3 ring binders and much much more.
- Set of 8, 10, 12, 14, 16 mm
-
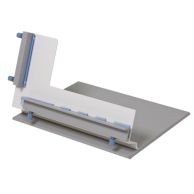
$999.00
- Places the hard cover book block in an up-right position.
- Help align the cover and book block.
- Compatible with: Fastbind BooXTer.
- Comes in two parts, a setter and a stand.
-
Fastbind Hard Cover Toolkit for Secura, Elite and Optima Perfect Binders
$249.00
- Consist of a hardcover nipping bar and a special paper guide.
- For use with Fastbind Secura, Elite and Optima Perfect Binders.
- Speed up your work.
- Easy placement for correct offset.
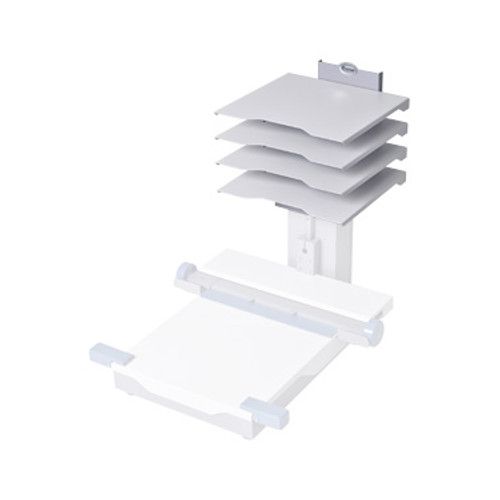
Fastbind Supply Shelf for FotoMount F32


- 0
- 1

Product Description
Product Details
- Helps to keep your work space organized and increase productivity.
- Supply shelf can be assembled on top of FotoMount to save table space.
- Rugged construction.
- Compatible with: Fastbind FotoMount F32.
- Part Number is FBFA32RACK.
Demonstration Video

Start off by creasing all of your pages. We can see the FotoCreaser C33 fits on top of F32 by lifting up the mounting lift.
Crease all your pages in the center and gently fold them. Once finished, remove the creaser, lower the lift, and now we will place our first end sheet
Peel off the contact sheet and line up the sheet with the edge of the lift. Clamp the other end down to hold it in place. Lift the guide up, on top of the end sheet.
Place your first folded pages in. Then stick a tacking sheet to that, using the guides ... Read More
This is the FotoMount F32, used in a full work station environment.
Start off by creasing all of your pages. We can see the FotoCreaser C33 fits on top of F32 by lifting up the mounting lift.
Crease all your pages in the center and gently fold them. Once finished, remove the creaser, lower the lift, and now we will place our first end sheet
Peel off the contact sheet and line up the sheet with the edge of the lift. Clamp the other end down to hold it in place. Lift the guide up, on top of the end sheet.
Place your first folded pages in. Then stick a tacking sheet to that, using the guides the same way. Continue to place in your sheets and tacking sheets until all your pages are in. Finish it off with another large end sheet.
Now cut off the excess edges.
Place the hard cover guide into the F32, then place your cover against it, Using the magnet to hold it in place. Use another magnet to ensure your pages do not shift forward.
Place your pages in, and remove half the contact sheet and stick it to the cover. Flip the book over and do the same to the other side.
Press on the cover and pull the rest of the contact sheets out. To completely stick your pages to the cover—and you are done!