We're sorry, but we no longer offer this item.
Call us at 1-800-944-4573 for personalized recommendations
or check out these similar items that may be a good fit:
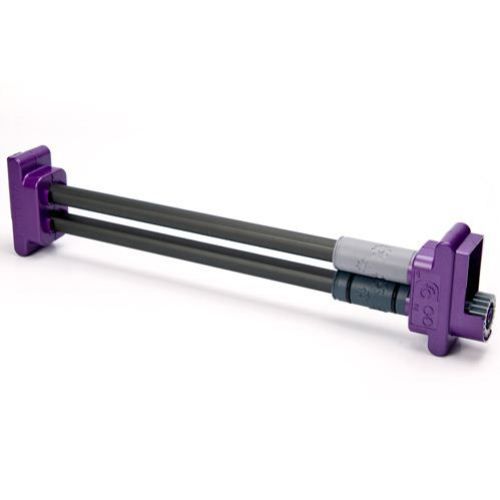
Xyron Border Patternz Starter Kit


- 0
- 1
- 2
- 3
- 4
- 5
- 6
- 7

Product Description
Product Details
- Uses scalloped , stars , hearts , dots , and floral pattern designs
- Supports papers from craft to cardstock up to 65 lbs
- Embosses border designs
- Works with the Xyron Creatopia
- Comes with free Floral Border design
- Weight: 3 lbs
- Part number: 3504-30-00
- List Price: $24.99
Demonstration Video
Xyron Border Patternz Starter Kit Overview
Today I'm going to show you the features of the Xyron Border Patternz for your Xyron Creatopia. The starter kit comes with flower cartridges but there are also a variety of other patterns available for your projects.
Your Creatopia machine comes with your permanent adhesive cartridge and component already inside. So, in order to install the Border Patternz, I'm going to take out my adhesive cartridge and to do that, you press your positioning button and roll it back to the third position. There's a one, two and three on the side of your Creatopia so you can see which position you need to be in. You are going to lift your adhesive cartridge straight up and out. Then you are going to push your positioning button again and roll it forward to position number 2. Press the component buttons, which can be found on either side of the machine. Press those in and then lift your adhesive component out as well and set it to the side.
Then to install your Border Patternz, you always want to install with the lighter roller facing up and there is also a one and two so you can see that the one needs to be at the top and you are going to install the gear side on the same side as the crank handle. There is also a gear inside the machine that you can see so you'll know you're lining it up correctly.
You just want to press this down into the component track and you'll hear a clicking noise, so you'll know it's locked in but you'll also be able to see the two little white locks so you know you've got it in there nice and tight. You're going to lift your tray and press it in and it's going to line up right up against your rollers.
Then you have a guide on either side of your tray and you are going to press your paper against the guide and then it's real easy to just flip it around and do it on the other side and you've got a darling border pattern that you can do on one side of your page or both sides. This is perfect for cards, invitations. It's just darling.
To switch out your Border Patternz cartridges, you again want to make sure that your tray is in the upright position, just like when you are on the plane. You push the component button and that's going to allow you to lift your component right out of the machine. The easiest way to take your cartridges off of the component is to just pull towards you.
A couple of things you want to keep in mind when you are replacing, switching out your cartridges. You want to make sure that the text is up, there is a Xyron on one side and a one and two with some images on the other and you just want to make sure that those are facing up. The cartridges are going to pop right off and then you can do whatever makes you feel the most comfortable; whatever way is easiest for you to put the cartridges back on.
A couple of things to keep in mind: there's a triangle on one side of each cartridge and you want to make sure that the triangles are facing the same direction on the same side of the component and the dark cartridge is always going to go on the bottom of the component or the gear side and the lighter cartridge is going to go on the top. The darker cartridge has the black rings, so that's another way to tell which is which.
You are just going to slide it onto the rods. The rods are D shaped so you'll know that you've got it going in the right direction and then I, and everybody makes fun of me, but the easiest way to get these on is to push up against the girls and press in and then we are just going to put our rods back together. If you find that the rods are not exactly lined up with your component, you can rotate them a little bit until they get exactly into the spot you need. Then you are just going to put it back in the machine, again the gear side goes on the side with the gear in the machine and you just pop it in until it's locked.
So now, we are going to use our heart cartridges. You slide the tray back in. What's fantastic about this is you can do a variety of sizes of paper; it doesn't have to be 12 x 12, because you are doing the border, you can do it on whichever end you like. So, I'm going to use an 8×8 piece of paper. I'm going to roll it through the first time and then if you want…for patterns like the heart pattern where there is a top and a bottom of each heart, if you want to just flip it around and have one set of boarders going one direction and one set the other, we just flip the paper around like we did with the floral pattern. This is going to give you a nice border pattern on each side of your paper; one going up and one going down.
But, what if I wanted the hearts going up on both sides? Well, you can do that now with the fabulous Creatopia machine. So, I'm going to start off again with a 12×12 sheet of paper, line it up against my guide and then I'm going to set this aside for just one second and then I'm going to move the cartridges over to the other side of the machine.
In order to do that, again remember you always want to have your tray in the upright position, I feel like a stewardess, then I'm going to press down on the component buttons that's going to pop this right out. The easiest way for me, everybody will find the way that is easiest for them, is that I just push it up against me and press these into place and slide it right back into the machine. Again, lock it in. Put your tray back down and slide it in so that it's right up against your border.
Now, when I roll it through on the opposite side, it's going to give me the exact same pattern with the hearts facing up. Now you can see the different between the two patterns: one going up in both directions and one going up and one going down. So, that really give you a lot of possibilities when you are working with your border patterns.
For more information about Creatopia, check us out at Xyron.com.
You want to make sure that your tray is in the upright position. You are going to press the positioning button and push your handle back into the three position. The numbers one, two and three are installed on the side of your component. You are just going to lift your adhesive cartridge up and out and set ... Read More
You want to make sure that your tray is in the upright position. You are going to press the positioning button and push your handle back into the three position. The numbers one, two and three are installed on the side of your component. You are just going to lift your adhesive cartridge up and out and set that aside. Then you're going to push your positioning button again and move it back to position number 2 and then press your components buttons which can be found on either side of your machine. Press those in and lift straight up and out and set that to the side as well.
Then to install your Patternz component, you always want to install with the gear facing towards the handle and another way to make sure you are putting it in the right position, you can see the gear inside the machine, so you want to match gear to gear. You are just going to slide those into the component tracks and press those down until you hear a clicking noise and that means that it's locked into position. There are little locks, plastic locks on either side of the component and you'll see those to know that it's locked into place. Then you are simply going to lift up your tray, slide that into position and it's going to butt up right up against the rollers, so you know you've got it in the right slot. Then you simply take your paper; I'm going a 12 inch piece of paper and you can line it up on either side of the tray guide or you can insert it right into the middle. Then you are just going to crank the handle going clockwise. This is so cool. It's going to give you a full sheet of 12 x 12 embossed paper. This is just perfect for all kinds of invitations, scrapbook pages, cards, the possibilities are endless.
For more information on Xyron Creatopia, come check us out at Xyron.com.