Banner Bug 22.81" x 59.81" Retractable Banner Stand - Silver (Single-Sided)
196.72
NewCondition
OutOfStock
We're sorry, but we no longer offer this item.
Call us at 1-800-944-4573 for personalized recommendations
or check out these similar items that may be a good fit:
Banner Bug 22.81" x 59.81" Retractable Banner Stand - Silver (Single-Sided)


SWIPE FOR MORE IMAGES
- 0
- 1
- 2
- 3
- 4
- 5
- 6
- 7
- 8
- 9
- 10

Product Description
This 22.81" x 59.81" Banner Bug Retractable Banner Stand is a stylish, sleek, modern single-sided one-pole retractable banner stand that is both compact and durable. Banner Bug Retractable Banner Stand is easy and fast to set-up, rolls up in seconds, and when the time comes for new graphics, they're quick and easy to change. This 22.81" x 59.81" Banner Bug Retractable Banner Stand has a silver colored base with a black end cap, and comes with a nylon carrying bag. Get your business noticed with this 22.81" x 59.81" Banner Bug Retractable Banner Stand.
Product Details
- Product Model: Baby Bug (Single-Sided)
- Graphic Panel Size (W x H): 22.81" x 68.875" (580mm x 1750mm)
- Visible Graphic Area (W x H): 22.81" x 59.81" (580mm x 1520mm)
- Color: Silver with Black End Caps
- No of Poles: One
- Includes: Nylon Carrying Case (Black)
- Top Bleed: 1.19" (30mm)
- Bottom Bleed: 7.875" (200mm)
- Recommended Applications: Trade shows, Public events, Retail applications, Point of Purchase (POP), Hospitality environments, Conventions, Meetings, Casinos, Sports Venues
- Part Number: DU1058
Demonstration Video
Drytac Banner Bug Graphic Attachment Demo Video
Transcript:
Drytac Banner Bug Graphic Attachment Demonstration
BannerBug Graphic Attachment
Remove yellow release tape from the grey plastic header strip
Place on back of panel at the very top
Fold panel back over
Take header rail and slide onto panel
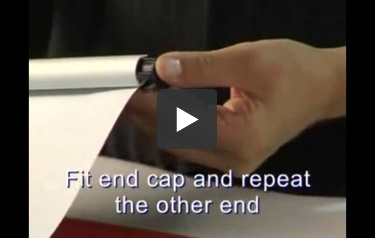
Note the position of the panel - the black clip should be facing up
Fit end cap and repeat the other end
Turn the frame upside down so that the yellow tape on the lead sheet faces down onto the base of the panel
While holding the lead sheet remove the yellow release tape to mount the panel.
Press down firmly
Turn the frame over onto i ... Read More
BannerBug Graphic Attachment
Remove yellow release tape from the grey plastic header strip
Place on back of panel at the very top
Fold panel back over
Take header rail and slide onto panel
Note the position of the panel - the black clip should be facing up
Fit end cap and repeat the other end
Turn the frame upside down so that the yellow tape on the lead sheet faces down onto the base of the panel
While holding the lead sheet remove the yellow release tape to mount the panel.
Press down firmly
Turn the frame over onto i ... Read More
Drytac Banner Bug Graphic Attachment Demonstration
- BannerBug Graphic Attachment
- Remove yellow release tape from the grey plastic header strip
- Place on back of panel at the very top
- Fold panel back over
- Take header rail and slide onto panel
- Note the position of the panel - the black clip should be facing up
- Fit end cap and repeat the other end
- Turn the frame upside down so that the yellow tape on the lead sheet faces down onto the base of the panel
- While holding the lead sheet remove the yellow release tape to mount the panel.
- Press down firmly
- Turn the frame over onto its base
- While holding the panel firmly, remove the spring locking pin
- Slowly allow the panel to roll into the frame
- Do not let go - guide it gently all the way in
- The system is ready to use
- Any difficulties please call your supplier
Drytac Banner Bug Graphics Stand Double Retensioning Demo Video
Transcript:
Re-tensioning BannerBug Double
1. On the end with two half plates, remove right plate leaving left plate in position
2. Remove spring shaft from frame
3. Spin around and remove the full end plate and the second spring shaft
4. With that side open, replace the spring into the frame. Keep the flat bar of the shaft closest to you
5. Locate full end plate onto the flat bar and push shaft into frame
6. Locate round spring shaft into end plate at other end
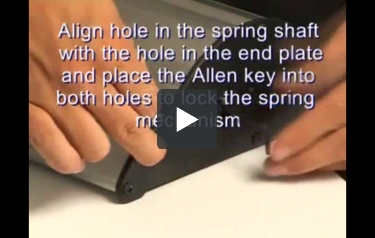
7. Align hole in spring shaft with the hole in the end plate and place key into both holes to lock the spring mechanism
8. Return to th ... Read More
1. On the end with two half plates, remove right plate leaving left plate in position
2. Remove spring shaft from frame
3. Spin around and remove the full end plate and the second spring shaft
4. With that side open, replace the spring into the frame. Keep the flat bar of the shaft closest to you
5. Locate full end plate onto the flat bar and push shaft into frame
6. Locate round spring shaft into end plate at other end
7. Align hole in spring shaft with the hole in the end plate and place key into both holes to lock the spring mechanism
8. Return to th ... Read More
Re-tensioning BannerBug Double
1. On the end with two half plates, remove right plate leaving left plate in position 2. Remove spring shaft from frame 3. Spin around and remove the full end plate and the second spring shaft 4. With that side open, replace the spring into the frame. Keep the flat bar of the shaft closest to you 5. Locate full end plate onto the flat bar and push shaft into frame 6. Locate round spring shaft into end plate at other end 7. Align hole in spring shaft with the hole in the end plate and place key into both holes to lock the spring mechanism 8. Return to the tension end and using grips, lock the flat end of the spring shaft 9. Holding the grips turn clockwise to tension spring mechanism- DeskBug 25turns
- 580/22” 18turns
- 850/33” 25turns
- 1000/39” 28turns
- 1200/47” 32 turns
- 1500/59” 34 turns
- 1800/72” 36 turns
- Giant Bug 32 turns
Drytac Banner Bug Single Retensioning Demo Video
Transcript:
Here is a transcript of this video:
Retensioning BannerBug Single
1. Remove all the screw from right side of frame
2. Remove spring shaft from frame
3. Replace spring shaft with the lead sheet protruding from the front of the frame
4. Fit end plate onto the shaft
5. On the opposite side locate the end of the spring shaft in the round hole of the end plate
6. Align hole in the spring shaft with the hole in the end plate and place the Allen key into both hole to lock the spring mechanism
7. Return to the tensioning end and using grips or pliers, lock the flat end of the spring shaft
8 ... Read More
Here is a transcript of this video:
Retensioning BannerBug Single
1. Remove all the screw from right side of frame 2. Remove spring shaft from frame 3. Replace spring shaft with the lead sheet protruding from the front of the frame 4. Fit end plate onto the shaft 5. On the opposite side locate the end of the spring shaft in the round hole of the end plate 6. Align hole in the spring shaft with the hole in the end plate and place the Allen key into both hole to lock the spring mechanism 7. Return to the tensioning end and using grips or pliers, lock the flat end of the spring shaft 8. Holding the grips, turn clockwise to tension the spring shaft- DeskBug 25turns
- 580/22” 18turns
- 850/33” 25turns
- 1000/39” 28turns
- 1200/47” 32 turns
- 1500/59” 32 turns
- 1800/72” 32 turns
- Giant Bug 32 turns
Related Categories you might also like

Downloadable Information
Questions & Answers
▶
Asked by aline
Thank you for your question. The BannerBug Banner Single-Sided with retractable banner stands 33.4” x 85.375” weighs 12 pounds.
Answered by MyBinding
▶
Asked by Terry Hull
Thank you for your question. I contacted DryTac the manufacturer of the Banner Bug Retractable Banner Stand and unfortunately they do not make the banners that go with this stand. We do have relationships with a large variety of vendors that make a wide assortment of custom items. Please give our customer service department a call at 1-800-944-4573 with the specifics of what you are looking for and we can see what we can work out for you.
Answered by MyBinding