Compatible with film up to 10mil thick (3" core) & boards up to 1/2" thick
No warm-up time required
Up to 138" per minute adjustable speed
Product Description
Introducing the GFC 220C – your ultimate companion for the latest wide format inkjet printers. Designed with infinite hand wheel adjustment and boasting 2.5" diameter rollers, this compact powerhouse redefines convenience and precision. Crafted to maximize space without compromising efficiency, the GFC 220C promises consistently professional results at an unbeatable entry-level price point. Ideal for photo studios, copy shops, and graphic designers, its intuitive controls and included foot pedal ensure seamless operation. With a mere 5 square feet footprint, elevate your printing experience today with the GFC 220C.
Product Details
Entry Level Priced - Designed for small operations.
User Friendly - Intuitive controls.
Versatile - Mount, laminate pre-mask tape.
Professional Design - Rugged, reliable, feature-rich.
Dimensions with stand (W x D x H): 46" x 22" x 42"
Shipping Dimensions Machine ( W x D x H): 43" x 23" x 22" 109 lbs.
Shipping Dimensions Stand ( W x D x H): 30" x 19" x 7" 35 lbs.
Warranty: 1 Year Manufacturer's Warranty Parts & Labor (Installation is available)
Video
Gfp Applications - PSA Overlaminate on Printed Vinyl using the Gfp 220C or 230C Laminators
Transcript :
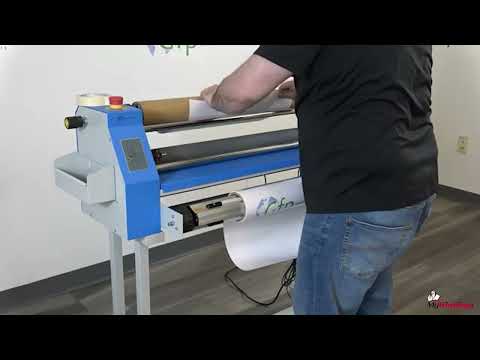
"So now we're going to do a single side lamination with a cold laminate here onto a roll of printed media that we print on vinyl here. We're going to start by loading up our film onto our back supply shaft or rear supply shaft by opening our cradles, removing the shaft, coming over to our film, simply putting the shaft into the roll laminating film, twisting, and putting the shaft back into the cradles. Now, we're just going to close up our cradles, and we can align this with our ruler that's on our shaft. We got an 18-inch roll here, so we're going to just put it between the nines and leave that be.
Now, we're going to come to our media. So, we're going to remove our lower supply shaft and do practically the same thing. We're going to remove the shaft, put our roll of vinyl, come through, and then into the cradles, close our cradles, and center our roll. Another way to web it up, another method I'm going to start the same way. We got to get our film to the release liner take-up to get our release liner off. I'm going to pull the tape, pull back and spin back up, and then we're going to take our film again and go under our take-up KN around the front hand Wheel bar and spin our take-up and get our film across here.
We're going to take our knife, our blade, being safe and be around the rollers and just score our film. We're going to separate our film. What we're going to do is we're going to bring it down to the front of the roller, the top roller, kind of just tuck it for a second, then going to lift our table and then just bring it down past the bottom roller about a couple of inches past the bottom roller and just let it hang close my table. Then I'm going to grab my leader board and I'm just going to push that into the rollers and just run that a few inches till I have a little bit here left. And what I'm going to do is I'm going to take some tape, some heavier tape, and just take a piece of that and stick that for a second here.
I'm going to bring my roll of prints and just pull up and I'm going to stick it to the lead edge of the board and tape it down good and just make sure. Now that I got it in place, I'll take a second piece of tape just to be safe and then run it. What will happen is once we're through the board, the roller will stop, the machine will stop, and we just come down and just close our roller until we hit that stop point and then a little bit more, a 12th of a turn, watch our liner here. We're going to slow down our take-up and just let it run, and we're good to go."