


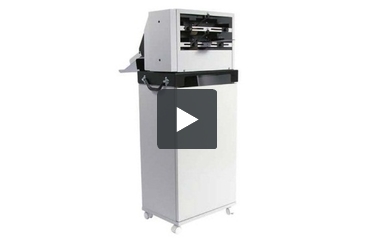
Martin Yale 10-up Business Card Slitter - GC210
FAQ: 1 Questions, 1 Answers
1 Q&As


Please Note: Ships in 7-10 Business Days
Item# GC210
- Quickly and professionally produce business cards with bleed edge design.
- Easily converts 8 1/2" x 11" sheets to finished 2" x 3 1/2" business cards with a simple two pass operation.
- Cuts up to 360 cards per minute.
- Adjustable paper guides.
ProductDescription
The Martin Yale GC210 Business Card Slitter is specially designed to create business cards with a full bleed edge. It features a convenient extra large waste receptacle for the scraps to help save time and clean up. With a simple two-pass operation, this safe and easy-to-use machine easily converts 8-1/2" x 11" sheets into finished 2" x 3-1/2" business cards with either a full bleed or a no-bleed design. Able to continuously feed stacks up to 5/8" thick, this machine will produce up to 360 completed cards per minute. The cutting blades are made of hardened steel and are self sharpening for years of operation without sharpening or replacement. Featuring adjustable paper guides allowing for easy customized set-up, as well as a self-cleaning rear cover panel that strips away waste. Plus, for maximum safety, the machine will not operate if the rear cover is not in place. Comes with a CD containing prepared templates for common design programs - Quark, InDesign, Illustrator, Word and Publisher.
Product Details
- Quickly and professionally produce business cards with bleed edge design.
- Fits securely on custom waste bin for maximizing run time and no-mess production.
- Easily converts 8 1/2" x 11" sheets to finished 2" x 3 1/2" business cards with a simple two pass operation.
- Self-sharpening blades.
- Adjustable paper guides.
- Cuts up to 360 cards per minute.
Item Specifications
- Capacity: 360 cards/min.
- Printed sheet: 10-up
- Card format: 2" x 3-1/2"
- Electrical: 115V
- Dimensions (W x D x H): 17" x 10-5/8" x 28-1/4"
- Manufacturer's Warranty: 180 Day Manufacturer's Warranty (Extended Warranties Available)
Demonstration Video
Martin Yale GC210 10-Up Business Card Slitter Demo Video
Transcript :
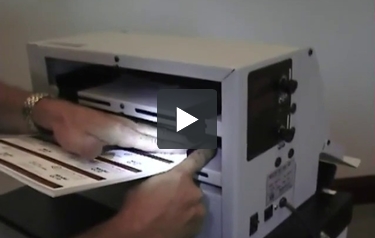
Welcome to MyBinding video. Let’s take a look at the Martin Yale 10-Up Business Card Slitter GC210. This business card slitter is specially designed to create business cards with a full bleed edge. The controls are simple, all on one side. You slide your product right in on one side and it comes out on the other. It’s a 2-step process, so you take that first cut, put it in the top shelf, making sure all adjustments are correct, place it all the way and it pops out all of your cards. This safe and easy to use machine easily converts 8.5 x 11 sheets into finished 2 x 3.5” business cards with eit ...
Welcome to MyBinding video. Let’s take a look at the Martin Yale 10-Up Business Card Slitter GC210. This business card slitter is specially designed to create business cards with a full bleed edge. The controls are simple, all on one side. You slide your product right in on one side and it comes out on the other. It’s a 2-step process, so you take that first cut, put it in the top shelf, making sure all adjustments are correct, place it all the way and it pops out all of your cards. This safe and easy to use machine easily converts 8.5 x 11 sheets into finished 2 x 3.5” business cards with either a full bleed or no bleed design. And it features a large waste receptacle right here on the front, easy to use and dispose. 360 cards in a minute, that’s the GC210 by Martin Yale. For more demos, reviews and how-to’s, check out MyBinding.com.
Martin Yale Gc210 Business Card Slitter Basic Operation And Set Up Video
Transcript :
This video presentation is to introduce the basic operation and set up of the Martin Yale GC210 Business Card Slitter. But before we get started with the slitter, let’s talk a little bit about the cards you’re going to imprint. With your slitter, you received a template to produce a ten-up card similar to this and that should produce an 8 ½” x 11” somewhat like this. As you can see, we’ve added a bar so we can make a bleed imprint at the bottom of every card and there’s a bleed imprint on three sides, on each side of the card. So this is a three-sided bleed. Now, you can make the cards a four- ...
This video presentation is to introduce the basic operation and set up of the Martin Yale GC210 Business Card Slitter. But before we get started with the slitter, let’s talk a little bit about the cards you’re going to imprint. With your slitter, you received a template to produce a ten-up card similar to this and that should produce an 8 ½” x 11” somewhat like this. As you can see, we’ve added a bar so we can make a bleed imprint at the bottom of every card and there’s a bleed imprint on three sides, on each side of the card. So this is a three-sided bleed. Now, you can make the cards a four-sided bleed or no bleed at all. Just make sure that your image that’s coming off your digital printer is very square on the sheet. It should be perpendicular to the top and parallel to the sides. You understand that many digital printers will shift that image just a little bit from one sheet to the next so that gutter also helps you compensate for that. When your cards are printed ... excuse me … cut, they’re going to look like this. So each cut card has been cut. The end has been cut off. The middle has been cut out. Back has been cut out. And between each card, a small gutter has been cut out and you can see how it’s cut off the bottom of the imprint to create the bleed on the bottom and on both sides of the card. So as long as your imprint is nice and straight, you haven’t had too much image shift from one to the other, then your cutter should cut perfectly square, wonderful cards. Just with some basic setups so now we talk about that. Okay, to use your GC10, you’ve got your image and I’ve got about 5” x 5” 16th of an inch stack of paper here, and I’m going to slide it in to the bottom station. Always start with the bottom station. The system comes with weights like this and we’ll just place that right on top. It helps to make sure that all of your sheets are going in. Now, we’re going to flip this on and, as you’ll see, it makes the vertical cut first and it’s cutting out the middle and cutting out both sides. It should cut nice and smooth, all of your cards falling into place. And you’ve got the two black rubber stoppers there keeping them from falling off the tray. There, let it stop. And we’re going to take these vertically cut parts, fix that stack. Turn it off just a second there. We’re going to place these in this top station and, just like before, we’re going to take the weight for the top, slip it on there and turn the machine on. You can see the cards turn out fully cut and fall into the stations on the top. Okay, all the cards are done, turn the system off, take them off each station and your business cards are cut. The system will cut about 300 cards a minute. So let’s talk now about some things that might go wrong and how you can address them.
We are now going to go through basic set up and troubleshooting of the GC210. First, if you happen to have a sample strip cut of your printed card stock of the proper paper thickness, you will want to place it in the center down here on top of the feed tire, underneath the pressure arm. If your piece of material goes underneath the retarder and you feel a drag, and you can feel a drag there, that is very good. Now, if, while it’s still in place, use a second card and now you see it will not pass underneath the sheet separator. So you’re now set for one card thickness. You will perform this on both the upper and the lower settings. The adjustment of the sheet separator will be over here on the side of the machine. It will show which way to turn it – clockwise to make it thinner, counter-clockwise to allow thicker material through. So you have a top adjustment and a bottom adjustment for each shelf. We are now going to discuss proper paper guide adjustment after you have determined where the registry is on your printed sheet in alignment with the slitter blades. What is most important is once you do have that registry established, start on the bottom with your stack of paper. One sheet of paper will not work because you’ll see in a moment. Once you place your stack of printed stock in place, some stock from ream to ream will have a difference in width. This width will allow this play side to side from your stack, therefore, you could have one sheet go in slightly crooked and the next one going another way. So this is how I’m going to request you do that. Loosen the knob underneath one paper guide only. Push in on the paper guide, forcing the stack against the side of the other paper guide. Now, push down on the paper stack, which is also holding the paper guide in place, and slightly snug your paper guide. Now, as you can see, it slides very, very easily and there is no play side to side. This will guarantee your stock to be fed straight. Repeat this set up on the top. Determine where your registry is. Make sure you have one paper stop loosened. As you can see, this is already loose. Loosen one paper stock, push it up against the other and push this up against. Now, from there, you definitely want to hold that paper stock down. Tighten the stock. Check for side to side. There is no or very little side to side play, but, yet, it is extremely free to be fed. This will guarantee both your upper and lower opening to feed the card stocks straight. We are now going to review what makes a good cut for your business cards. Part of it is how the scrap is evacuated away from the working area of the cards. And, as you can see, we’ve already partially fed a sheet through the machine and stopped it. I am now going to lift the rear guard, and, as you can see, we have the two 3 ½” wide strips have already been cut and they’ve exited. Make sure the strips will push down, are free of any interference of rubbing on the stripper plate on the back. As you can also see, the three pieces of scrap that are being cut off the sides of the card as well as the gutter down through the center. What makes this very important for the scrap evacuation is the unit is sitting on top of a waste bin that is supplied. This waste bin is a 60-liter and it has a very large area to accumulate very much scrap. Your waste will freely fall down into waste receptacle until you can conveniently empty it in the future.
Now, let’s talk about the upper opening. As we previously showed you before, for the bottom opening, we have fed through a series of cards partially on the top and stop the machine so you can see the scrap evacuation. You can see the five cards from your tin up format being cut with the outside scrap and all of the gutters in between cards had been stripped out and gravity will allow this scrap to fall while these cards will exit into the exit tray. It is very important that your cards are relatively flat. Therefore, after printing your card stock, please lay on a flat surface, such as a table, and place books on until it has cooled. This will help your cards to freely exit the machine and run full lots. Your unit is also supplied with a set of top plates. One is for the 11” dimension and the other is for your 8 ½. For simplicity, I’m showing you only one, the 11”. What these top plates are for is to provide additional weight on top of lighter card stock that has been laser printed because the paper is curled. You will have inconsistent feeding and card cutting with curled stock. Therefore, these plates can assist in trying to get a proper cut. After putting in your card stock, these plates will go on top of the stack and push it in. During the next run, you should pull them out before you pre-load the stack and then it goes in again.
If you are running glossy stock and are having difficulty with it feeding correctly or non-hesitating, Martin Yale does offer as an accessory an additional style of top plate. As you can see the difference, one top plate is cut out for around the feed tire. The other has a small tongue on it which is going to assist the pressure arm and a little more here that’s going to push the stock against the feed tire more completely. In the same operation, put in your glossy stock then install your top plate. You will be able to perform glossy stock just like any other. Periodically, it is a good practice to maintain your feed roller. The feed roller will get dirty from accumulating paper dust and ink. A very, very simple way to perform this cleaning operation is to utilize your paper support that comes with the machine. Remove the paper support as shown, take a clean, white rag, place the paper support inside of it and pull tightly. You may use warm soapy water or any other household cleaner that will not contain bleach nor ammonia because that will damage your feed tire. Lightly moisten the rag, turn the machine on and insert your moistened rag down onto the feed tire and apply pressure slightly and move it back and forth and your top feed tire will now be clean.
Related Categories you might also like


Questions & Answers
▶
Asked by Alan Dano
Thank you for your question. We do ship internationally. If you put items in your cart and view the cart, you can enter your country and postal code to get the shipping cost. Please contact our customer service department directly if you need assistance placing the order and we would be happy to help.
Answered by MyBinding