Luxor 16 Tablet/Chromebook Open Charging Cart - LOTM16
FAQ: 0 Questions, 0 Answers
0 Q&As
Item# LOTM16
- Color Finish: Gray & White
- Capacity: 16 Tablets / Chromebooks
- Divider Distance: 1.35"
- Weight Capacity: 75 lbs.
ProductDescription
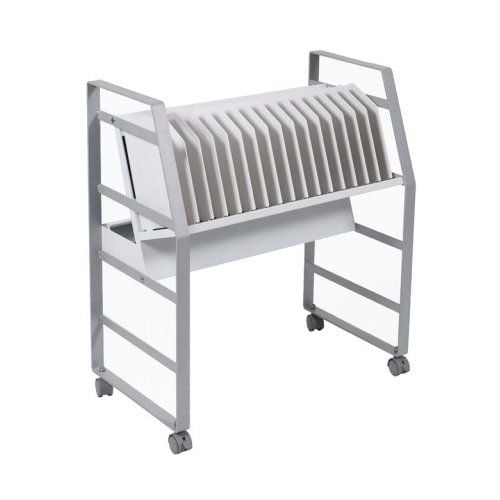
Luxor LOTM16 - 16 Tablet / Chromebook Open Charging Cart. Quickly access your tablets and chromebooks with Luxor's first open charging cart. The rolling charging station stores devices while keeping them fully charged and readily available. Charging cables are neatly organized with cord clips and the steel frame emphasizes the clean and modern appearance. This one of a kind cart is ideal for any fast paced environment that need devices easily accessible, charged and ready for immediate use. Features convenient grab and go access. Steel frame is long lasting and offers a clean appearance. Sloped shelves include padding to safely stow devices. Keeps charging cords organized with two cord clips per cable. Easily transports tablets/ Chromebooks with four casters and two locking brakes. Includes a 16 outlet power strip with a 450 joule surge protection. Easy assembly. Cart dimensions are 27"W x 14.75"D x 30"H . Divider slots are 1.35"W x 8"D x 10.43"H. Cord length is 10 feet.
Product Details
- Convenient grab-and-go access.
- Steel frame offers a clean and modern appearance.
- Sloped shelves include padding to safely stow devices.
- Keeps charging cords organized with two cord clips per cable.
- Easily transports tablets/Chromebooks with four casters and two locking brakes.
- 16-outlet power strip includes 450 joule surge protection.
- Ships ground in one carton.
- Quick assembly; tools included.
Item Specifications
- Item Number: LOTM16
- Material: Steel
- Color Finish: Gray & White
- Capacity: 16 Tablets / Chromebooks
- Cart Dimensions: 27" W x 14.75" D x 30" H
- Weight: 37 lbs.
- Shelf Quantity: One
- Divider Make: Plastic (High Impact Polystyrene)
- Divider Distance: 1.35"
- Divider Slot Dimensions: 1.35" W x 8" D x 10.43" H
- Cord Length: 6'
- Cable Management: Two cord clips per divider
- Casters (4): 1.6" casters; two with locking brakes
- Weight Capacity: 75 lbs.
- Power: 16-outlet horizontal power strip UL Approved
- Voltage: 125V/15A
- Ship Method: Ground
- Shipping Carton Dims: One carton; 33" W x 18 D" x 5.25" H
- Shipping Weight: 41 lbs.
- Assembly Required: Yes
Demonstration Video

Luxor 16 Tablet/Chromebook Open Charging Cart - LOTM16
Transcript :
Welcome to MyBinding Video. This is the 16 Tablet and Chromebook Open Charging Cart from Luxor. This rolling charging station stores up to 16 devices while keeping them all fully charged and readily available. The steel frame and impressive design keep your devices safe in this open cart. Four caster wheels allow the cart to move wherever you need, and two of the wheels can lock the cart in place. Behind the frame is a large charging tray that can accommodate the necessary chargers. A 16 outlet power strip with 450 joule surge protection provides power to all of the devices, charging them as q ...
Welcome to MyBinding Video. This is the 16 Tablet and Chromebook Open Charging Cart from Luxor. This rolling charging station stores up to 16 devices while keeping them all fully charged and readily available. The steel frame and impressive design keep your devices safe in this open cart. Four caster wheels allow the cart to move wherever you need, and two of the wheels can lock the cart in place. Behind the frame is a large charging tray that can accommodate the necessary chargers. A 16 outlet power strip with 450 joule surge protection provides power to all of the devices, charging them as quickly as possible. If you’re worried about putting it together, take a look at the assembly video below. I’ll walk you through step by step so everything goes smoothly. Help your school or business organize and power their expensive tools while keeping them ready at a moments notice. For more videos and all your binding needs, visit MyBinding.com.

Assembly Luxor 16 Tablet/Chromebook Open Charging Cart - LOTM16
Transcript :
Welcome to MyBinding Video. In this video, I will show you step by step how to construct the Luxor 16 Tablet Open Charging Cart. First I recommend spreading out the parts on a flat surface and use the directions page to make sure they’re all included. Then sort the package of screws, bolts, washers and nuts.
Step 1. Start by laying the two side frames (parts A and B), out on your work area. Take the four lock washers, four acorn nuts, four caster wheels, and the two included wrenches. From the bottom of the frame, insert the bolt on the caster through the drilled hole, put a lock washer on, t ...
Step 1. Start by laying the two side frames (parts A and B), out on your work area. Take the four lock washers, four acorn nuts, four caster wheels, and the two included wrenches. From the bottom of the frame, insert the bolt on the caster through the drilled hole, put a lock washer on, t ...
Welcome to MyBinding Video. In this video, I will show you step by step how to construct the Luxor 16 Tablet Open Charging Cart. First I recommend spreading out the parts on a flat surface and use the directions page to make sure they’re all included. Then sort the package of screws, bolts, washers and nuts.
Step 1. Start by laying the two side frames (parts A and B), out on your work area. Take the four lock washers, four acorn nuts, four caster wheels, and the two included wrenches. From the bottom of the frame, insert the bolt on the caster through the drilled hole, put a lock washer on, then the acorn nut. Use the two wrenches to make sure the caster is on tight. Make sure the casters with brakes go on the angled sides. Repeat for the remaining three casters, and if you have a 12mm socket wrench, it can go much quicker. Move the frames out of the way for the next step.
Step 2. Take the back panel (part C), and top panel (part D), to your work area and get three bolts and the hex key. It can be a little tricky, but use one hand to support the two pieces until you can start the bolt. Once they’re started it will stand on its own and you can tighten the bolts with the hex key. Then flip the panels over.
Step 3. Take three more bolts and the right side frame. Set the frame next to the panels, and lift the back panel to start the bolt at the top of the frame. Once its started, you can easily lift the panel up to start the other two bolts. Then tighten all three with the hex key.
Step 4. Take three more bolts and the left side of the frame. Set the frame against the panels and lift it up until the holes line up, similar to step 3. Then tighten all three with the hex key. Then set the unit upright.
Step 5. Take the two power tray panels (parts E and F), two screws and a screwdriver. On the back side of the cart, the two panels will match the angle and line up to the screw hole at the bottom of the back panel. Use the screwdriver to make sure they’re tight.
Step 6. Take the power tray panel (part G), two bolts, two screws and the package of power strip brackets. The power tray panel will slide into the slot under the screw holes. Make sure it’s flat and pushed all the way up to the back panel, then secure it through both side frames with the two bolts and the hex key. Take your power strip brackets, set them inside the panel and drop the flat head screws into the holes. Spin on the rectangular nuts, make sure the brackets are aligned parallel, and tighten with the screwdriver. Then fasten the two round head screws underneath the power strip panel.
Step 7. Take the power strip set it securely into the brackets. You should hear each tab snap around the power strip. Then undo the ties on the cord and let it hang down. Take the back panel (part H) and the last four screws. Place the panel against the screw holes, with the power cord hanging through the opening, and secure it with the four screws.
Step 8. Open the bag of plastic cord clips and insert them by the nub on the flat side, with the clips coming out horizontally. There are holes for 16 clips on the lower bar, and 16 clips on the upper bar.
Then take the two packages of eight plastic dividers and set them into the slots on the support panels. With that, all you need to do is fill it up with chargers, and route the cords through the clips. This charging cart is a great tool to keep track of up to 16 devices, and makes sure the batteries are always topped off. For more assembly videos and all your binding needs, visit MyBinding.com.


