


Fastback Image Wrapper Hardcover Maker - PPImageWrapper


- Produce customized hard covers without messy glues, or heavy, expensive equipment.
- Dimensions: 23" x 32" x 3.25" (D x W x H)
- Maximum Material Thickness: 0.02" (at least 20 pt)
- Maximum Warparound Cover Size: 13" x 29.5" (33 cm x 75 cm)
ProductDescription
Product Details
- Produce customized hard covers without messy glues, or heavy, expensive equipment.
- The Image Wrapper is used with a template, Imageback Hardcover, and ImageBack Liners.
- It’s a guide with a self-healing cutting matte for trimming and wrapping your printed cover sheet onto the Imageback Hardcover.
- The finished covers are designed to work with all the Fastback® binding systems, including the Studio™ Binding System, Photobook Workcell™ System, and PhotoPress™ Binding.
Item Specifications
- Dimensions: 23" x 32" x 3.25" (D x W x H)
- Weight: 46 lbs (20.87 kg)
- Maximum Material Thickness: 0.02" (at least 20 pt)
- Maximum Warparound Cover Size: 13" x 29.5" (33 cm x 75 cm)
- Compatible Equipment: Fastback Binding Machines
- Compatible Supplies: Imageback Covers
Imageback Liners
Demonstration Video
Fastback Image Wrapper Hardcover Maker Demo Video
How To Wrap A Hard Cover Book With The Powis Parker Image Wrapper
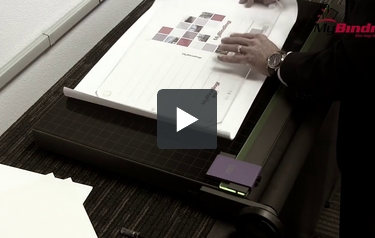
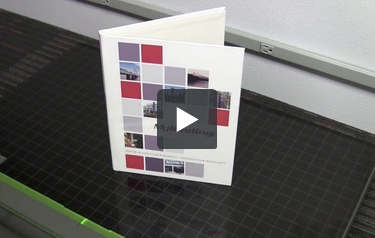
Hello and welcome to MyBinding video. Today we’re going to have a look at the Powis Parker Image Wrapper and the question everyone asks, how do I wrap my own hard cover book? This video is designed so you can watch just how the machine you’re investing works and how to do it step by step. This is the image wrapper. It has a built-in self-healing mat on the top and uses designing template plates to do the work. It come in various sizes including 12 x 12, 8 x 10 and standard 8 ½ x 11; that’s what we’ll be using today. Included with your machine is a reference card going through the steps you’re about to see. This is an image-back hardcover blank and the outside here peels back and reveals an adhesive edge. Next are the adhesive end-sleeves that we’ll use at the end of the project and finally this is the cover. We’ve designed ours with our own logo and look to it and built it on the 8 ½ x 11 template size. We’ve laminated one side and the other side is left blank. The dotted line right down the center of the template is really important. Be sure that the center of your spine goes right down that line and everything inside the dotted line around the outside of the plastic template will be what is seen on the front and back cover. With the straight edge, cut all the way around the plastic template, nice and close to the edge. When you’re all done, peel away your scraps, your set and ready to wrap. You can set both the template and your project to the side for now and pick up your cover blank. It’s a good idea to take your blank and initiate those creases and crimps just a little bit more so they’re nice and soft when you go to work with it. Open up your blank and lay it flat on your worktable. With a straight edge, lift just the corner of the adhesive and bend it back. This is expose the adhesive surface that you need for your cover. Continue to do this all the way around the circumference of your board. Be careful when using straight edges and handle your product carefully. When all the sides are released, flip your project over, bring the project down toward the bottom of the work surface and place it just in to that green ledge. Slide the clamp from the left hand side into place so that it holds it nice and steady. Now, we’re almost ready for your custom cover. Here’s a tip a tip to make things easier – pull back that right side just a little bit more and layer cover down on top of the whole thing. Make sure that bottom edge is right along the straight edge at the bottom of the machine. Press down on the right hand side so the adhesive begins and then flipping back the page, you can simply remove the sheet underneath your cover. Sliding with one hand and pressing and pushing out all the air bubbles as you go with the other hand, you can move your way all the way across to the center of the book. This is a great step for patience, really work the adhesive especially at the spine point deep into that cover. And then picking up the next sheet, begin to slide it off and work all the way across to the left side of the book. Again, looking for and working out any air bubbles as you see. Once that section is all done and everything is very smooth, gently lift up your project and flip it over face down. With the rest of the paper, it’s time to finish off your edges. This is where the tabletop as well as the green plate at the bottom come in handy. You can fold over the edge just like this by pressing it in to the plate and/or bring it down into the green ledge, it holds it in tight as you fold it nice and firm. Spend some time with each crease. It makes all the difference in the world. This is when the soft pressure roller plates come into play. They really cinch it down and hold it fast. No need to mess with them, they work on their own with just a little bit of downward force. When one edge is nice and sealed, fold in the sides of the corners of that edge and then move your way around the rest of the document, crimping and creasing with the pressure rollers after each fold. When all four sides are done, now is a good time to roll the entire document through the pressure rollers straight through. You can do vertically and horizontally. This really seals things and pushes out the rest of the bubbles and makes it nice and tight. This is where the hand wheels on the side can come into play. Don’t force your document through, just roll it on through. And there you go, very impressive. You’re almost done. Now for the inside sleeves to give that perfect finish look. Each inside sleeve has both a long and a short edge. With a straight edge, lift up that short end and pull it down to have a nice crease about a half an inch across. With the book cover facing down and flushed against the bottom edge of the machine and with the sticky side of the in set faced down all the way to the bottom, lay it on to the back side of the cover. Make sure it’s centered both left and right and as you remove the bottom sheet, slide and push with your hand all the air bubbles out as you move up with the outer sheet. You’re looking great and you’re almost done. Simply repeat the same thing with the other side. There it is. You’re all done. You’ve created your own perfect custom hard-cover book cover with the Powis Parker Image Wrapper. For more demos, reviews and how to’s, check out MyBinding.com.


