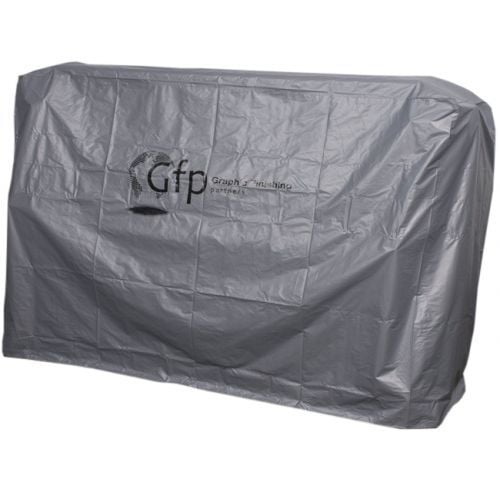
Dust Cover for GFP 865DH Laminator
FAQ: 0 Questions, 0 Answers
0 Q&As
Item# 04GFP865DH3DC
- Protect your laminator from dust and debris when not in-use
- Makes for clean, organized storage
- Covers your laminator to keep safe from dirt and damage
- Compatible with GFP 865DH Roll Laminator
Product Name
Item Number
Price
Qty
ProductDescription
Pair this dust cover with your GFP Graphic Finishing Partners 865DH Roll Laminator. It is designed to create a perfect fit, protecting your equipment investment from dirt, dust, and spills. Don't risk damaging your machine in a busy environment when not in use; add this Graphic Finishing Partners laminating dust cover to your workroom today.
Product Details
- Compatible Machine: GFP 865DH Roll Laminator
- Part Number: 04GFP865DH3DC
Demonstration Video

Gfp 865DH-3 Roll Laminator - Features Overview

Thermal Encapsulation with the Gfp 865DH Demo Video
Transcript :
So for this next application we're going to do thermal encapsulation. So, the first thing I want to do is get the machine started heating so I’ll turn the top dial up you'll notice when I do it went from green to flashing red. Same thing with the bottom. We'll get that started. When my heat comes up, usually within about five degrees of your set temperature, these will start to turn a little bit of green and still flash but once they get to their to the operating temperature they're going to go solid green.so while that's heating up I’m going to go ahead and start loading some film on the mach ...
So for this next application we're going to do thermal encapsulation. So, the first thing I want to do is get the machine started heating so I’ll turn the top dial up you'll notice when I do it went from green to flashing red. Same thing with the bottom. We'll get that started. When my heat comes up, usually within about five degrees of your set temperature, these will start to turn a little bit of green and still flash but once they get to their to the operating temperature they're going to go solid green.so while that's heating up I’m going to go ahead and start loading some film on the machine. Okay, so while the machine is heating up and before we load any film, I’m going to lift this so you can see what I’m doing. I'm going to lower the top roller until it just barely touches that bottom roller. And then I’m going to hit run so you can see that both the top and the bottom roller are turning. And what this will do is this will give us a nice even heat all the way around so you won't get any hot spots on the rollers. Okay, the machine is up to heat now so I’ll go ahead and start loading the film. Start with the bottom swing the shaft out. We're using a poly in film which means the adhesive is on the inside so I’m going to load that so it unrolls from the bottom. I'll slide that on, I’ll get it centered as much as possible. And then put that back on. Come over, load the top. Now to make sure, I’m going to bring that top roll of film down. I'm going to line it up to the bottom just to make sure that we are lined up straight and perfect. So, look at the edges. Okay. Okay that's pretty close, I’ll go ahead and rewind the top. Let that rest, bring my tray up. I'm going to take my threading card, I’m going to push this in between the rollers. I have to open my rollers. And I want to make sure that this goes all the way through so it's clearing the pull rollers as well. I'll bring the top like this; I just want to attach this threading card to it and I’ll take my bottom row of film. I'll bring this up and I’ll tack it right to the top. Now that I have the two pieces of film attached together, my threading card is through the rollers sticking out past the pull rollers, I’m going to go ahead and lower that pull roller. When I feel it, touch, I just go a little beyond. Then I will go ahead and start it with my foot pedal. As I see it going through, I’m going to bring my top rollers down, it's running, I’m going to press run, release the foot pedal, step around to the back. Make sure it's coming through correctly. Not wrapping up or anything like that. So, now go ahead and look for the rivers and wrinkles. And I can see, so I’m going to go ahead and add a little bit of break until those clear out. Once I see those clear out I may have to burp it. So, what I’ll do is I’ll open up the pull rollers just a little bit, pull on that web, and then re-tighten it. And you can see now, it's nice and flat, no rivers no wrinkles or anything like that. I'll go ahead and stop the machine and get my prints ready. It's all cleared out. I'll go ahead and press run and I’ll start my prints in. Leave a little bit of gap in between them and start my next set in. I will visually follow the prints through the machine. Once they clear my pull rollers in the back, I’ll go ahead and stop and cut those out. Now, one thing to note with thermal films, you cannot rewind them like you do with PSA films. The reason for that is thermal film will take a set, which means if you rewind it, it's going to stay curled no matter what you do to it. You'll never get that curl out of it, so don't ever try to rewind thermal film.

Roll-to-Roll Application on the Gfp 865DH Laminator
Transcript :
Today, I'm going to show you how to web up and run a roll-to-roll application using the GFP 865 DH. So, you can see I already have my top roll of film on the shaft, and I have my printed media down on the bottom. What I'm going to do is make sure that these are lined up correctly, and then we'll go ahead and do a full web up. So, I'm going to bring this top roll of film down, look at the edges of my media, line those up, make sure they're good and straight, just like that, and I'm going to go back around to the backside, rewind this. I'm going to lower my table back down. So, you can see, I'm ...
Today, I'm going to show you how to web up and run a roll-to-roll application using the GFP 865 DH. So, you can see I already have my top roll of film on the shaft, and I have my printed media down on the bottom. What I'm going to do is make sure that these are lined up correctly, and then we'll go ahead and do a full web up. So, I'm going to bring this top roll of film down, look at the edges of my media, line those up, make sure they're good and straight, just like that, and I'm going to go back around to the backside, rewind this. I'm going to lower my table back down. So, you can see, I'm going to take my film, run it up over here by the idler bar, bring that up to the rewind tube. At this point, I'm going to go ahead and attach the release liner to the tube. So, I'll take my tape, twist it 180 degrees so I have adhesive on both sides. I will attach this to the tube, then bring the film up to it and tack that. I'll give it about a wrap just to make sure that it's going to stick. And I'll take a knife, I'm going to lightly score the film, not cutting into the release liner. Then I'll come around to the front, and right where I scored that film, I'm going to separate it from the liner, and then I'll bring it down over that top roller. I'll just let it rest right there. I'm going to flip up my feed tray, I'm going to take the media, and I'm going to go back behind this idler bar, and then I'll bring it up to that overlamming it on top. Now, at this point, I'm going to bring this up, I'm going to attach it to that film just like this. Then what I'm going to do is I'm going to push this into the center, and when I do this, I want to make sure that the film and the media are both nice and flat and tight against these rollers. If there's any bagging going on right now, as soon as I start running it, it's going to start skewing on me and getting rivers and wrinkles in it. So, I'm going to hold that right there. I'm going to run this top roller down until it touches. When it touches, I note the position of the handle on the hand wheel, and right now, it's at one o'clock. I'm going to go to two o'clock; it's all the pressure you need. If you go too far, if you get too much pressure, what will happen is the rollers will bow in the center, and when that happens, then you start to get rivers and wrinkles, and it starts trying to bunch up in the center and it destroys your print. So, I'll come over here, I'm going to make sure the machine's in forward, and I'm going to turn my speed down, and I'm going to use the foot pedal just to get it started through the machine, and I'll look for rivers, I'll look for wrinkles, and if I have to make any brake adjustments, then I'll go ahead and do that. Now, at this point, what I'm going to do is release the foot pedal, I'm going to go around to the backside and attach the web that I've just run through onto the rewind assembly. Once I'm back here, I'm going to make sure this is good and tight, I'll line up my tube with the edge of the web that just came through, I'm going to cut three pieces of tape or tear start in the center, attach that to the tube, and then do the same thing on both edges. Then I'm going to just turn the machine on to run and make sure that this is rewinding the way I want it. If I need to make any tension adjustment to this break, there's a knurled disk right here I can add brake tension or release brake tension to allow this to pull properly.


