Manual punch for up to 20 sheets* at a time (3:1 square wire & 4:1 round coil holes)
Integrated wire closer & includes crimping pliers
Heavy-duty, perfect for print shops, schools, and large offices
14" punching length with open throat & disengageable pins
Product Description
With the Akiles DuoMac 431 you can bind documents with both 4:1 pitch spiral coil and 3:1 pitch twin loop wire. The DuoMac 431 is the only combination machine of its kind. The unique design of the 431 includes a the ability to punch both a 4:1 pitch hole pattern for spiral coil binding and a 3:1 pitch hole pattern for twin loop wire binding up to 9/16". This gives you the ability to choose the look and feel of your bound books and presentations. Four to One pitch coil (4 holes per inch) is the standard pitch of spiral coil used for binding presentations, proposals and books. Normally, you would have to use two different binding machines to do the same tasks as the DuoMac 431. Now you can choose between these two great binding styles for all your reports and presentations and you can also save space, time and money.
Product Details
With two independent punching die sets, this versatile & easy to use combo binder allows you to punch & bind multiple systems and or different pitches.
Easy handle operation: Separate handles for punches and wire closer
Depth Margin Control: Provides the correct punch margin depth for each wire/comb size. Maximizes document tear resistance.
Open Punching Throat & Continuous Punching Guide: For an easy alignment & punching of longer documents.
Wire Closer Control: With continuous adjusting scale for an exact and secure closure every time
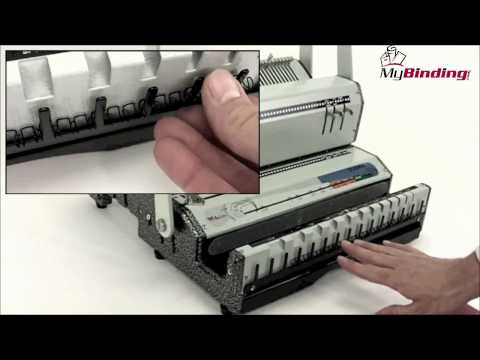
Welcome to MyBinding video. Today weš™re looking at the Akiles DuoMac 431, a 4:1 coil and 3:1 wire binding machine. Step-by-step letš™s bind a book and watch the DuoMac 431 in action.
With 3:1 wire binding, youš™ll make your punches with the top slot. Starting with the covers, slide them into the throat of the machine. Use the side control margin knob to adjust, set, and lock papers into position so all punches made are the same throughout the project. Pull out any disengageable die pins you might need for the size paper you need so there are no half holes punched. Then you make your punch. And continue to punch through the rest of the papers in your project. When all your holes are punched, assemble your project; itš™s time for binding. Threading your project over the wire bind is probably the most difficult part of the process. You need to choose the wire that best fits your project. You can do so with the graph on the front. With the dial on the right, you set the stop point for the closer which best fits the size wire youš™re using. Drape the wire over the fence in the front. In wire binding, thereš™s a little trick where you can hide the seam of your final bind. Simply take the last page and flip it over so the back of the back faces the front of the front and the seam will be hidden between the last page and the back cover. Thread your project over the teeth of the wire spine. Make sure all the teeth are fitting through all the holes. Lift your project up off the fence and turn it around so that the šœCš of the wire bind faces down into the closer. Lay it flat and make your close. And hereš™s where you see our little trick pays off; the seam is hidden between the back page and the back cover. Chips fall into the waste bin below and can be accessed from the front. And that is 3:1 wire binding on the Akiles DuoMac 431.
This is 4:1 coil binding. With your project all ready to punch, set the side margin control knob to make sure that all punches are consistent throughout your project. Simply set it for the size paper that you need and clamp down the dial. And pull out any disengageable die pins according to the size paper that you have so you have no half punches. Pull down on the long, more forward arm, and your holes are punched. Continue to punch through the rest of the pages in your project. And now itš™s time to bind with your 4:1 pitch spiral coil binder. You can do so by hand or with a separate machine. And thatš™s basically it with 4:1 binding with the DuoMac 431. Thereš™s also an adjustable depth of punch control knob on the right hand side so you can punch a deeper, much more stronger margin for larger projects.
And itš™s that simple with the DuoMac 431 by Akiles. For more demos and reviews of this product and many more, check out MyBinding.com.
No issues, a little squaky imo but does a good job at punching holes and the wite binding feels very nice
B
Barb Rose
Love the machine I purchased! The only tiny complaint is that I didn't receive a shipping notice with tracking. I had to contact the company, but they sent it by email in just a few minutes. I would buy from this company again.
G
Grant Paxton
Works great! Thanks!
G
Great machine/ Great Company
Great machine/ Great Company
I’m so glad I found this machine!! It punches through my chipboard covers to make my journals. It seems very durable and well made. I Know it seems like a lot of money but, it’s well worth it. I’ve tried the other machines that are cheaper on Amazon and they just don’t do the job like this one does. You won’t be disappointed.
The Akiles DuoMac 431 is a combination binding system that is designed for binding documents with more than one style of binding.
In fact, this machine allows users to produce high quality professional reports and presentations using one of two different hole patterns.
These two hole patterns allow users to choose one of four different binding styles to finish their documents, presentations and proposals.
This makes the DuoMac431 ideal for companies that want to customize the look of different types of documents or who want to distinguish their internal and external presentations.
Strengths / Features:
The Akiles DuoMac 431 is capable of producing two completely different hole-patterns. One punching throat is designed for producing a 4:1 pitch round hole pattern. This pattern is used with 4:1 pitch spiral coil binding supplies. The other punching throat on this machine produces a 3:1 pitch square hole pattern. This hole pattern can be used with 3:1 pitch twin loop wire, GBC Proclick binding spines and 3:1 Spiral Coil. All together, the two hole patterns produced by this machine can be used to bind documents with four different binding styles.
The 4:1 pitch round hole punch included on this machine is thirteen inches in length and has five strategically placed disengageable punching pins. These punching pins allow users to punch all of the most common sizes of paper using the four to one hole pattern. Specifically, the DuoMac 431 can punch letter size, A4, legal size, A5 and half letter sheets for binding with 4:1 pitch spiral coil.
The 3:1 pitch punch on the DuoMac-431 has fully disengageable punching pins and a fourteen inch punching throat. This allows for punching virtually any length of paper up to 14″.
Both the 4:1 and 3:1 punches on this machine have open punching throats. This allows for punching documents that are longer than thirteen or fourteen inches using a two step punching process. You simply punch one end of the document and then flip the document over and punch the other side. There is even a continuous punching guide to help you get the holes aligned correctly.
The DuoMac 431 also includes a pair of spiral coil crimping pliers. These coil crimping pliers will help you to cut and crimp the ends of your 4:1 and 3:1 pitch coil so that the coils don’t spin off your bound books.
On the right hand side of the DuoMac-431 there are two small knobs. These knobs allow you to adjust the distance of the holes from the edge of your paper. When binding small sized documents it is a good idea to set the holes so that they are close to the edge of the paper. This helps the pages to move smoothly inside the bind. For larger documents, you can add strength to the binding by setting the holes further away from the edge of your sheets.
The Duomac431 has a high quality wire closer and wire hanger on the front of the machine. This wire closer is made from high quality steel and should have not problem maintaining its accuracy over time. The wire hanger is extremely helpful for assembling your wire bound presentations and proposals during the binding process.
Weaknesses / Limitations:
Although this machine includes a huge number of great features, it does not include a coil inserter. Akiles suggests that this machine be paired with the Roll @ Coil modular inserter. The Roll @ Coil is reasonably priced and would certainly help to increase the coil binding productivity offered by this machine.
Each of the binding styles that can be used with the DuoMac 431 have their limitations. In fact none of these binding styles is a good choice for organizations that bind a lot of documents larger than 1″ thick. GBC Proclick is only available in three sizes ranging from 5/16″ up to 5/8″. Three to one pitch wire binding is available in sizes from 3/16″ up to 9/16″ and cannot be used for larger documents. Four to one pitch coil is available in sizes from 6mm up to 50mm. However, sizes above 25mm are very difficult to insert onto the edge of your books (imagine trying to spin a slinky onto the edge of your book). Three to one pitch spiral coil is available in the same sizes as 4:1 coil but has the same problems when you try to insert larger sized spines onto your documents.
The Duomac-431 includes a lot of great features. However, with so many features and options on one machine, this piece of equipment begins to look a little bit intimidating to many users. Inexperienced users may not know where to begin with a machine such as this. It isn’t that hard to figure out, as long as you are brave enough to try.
Recommendation:
Of all the machines in the Akiles DuoMac line of equipment the 431 is one of the most useful. It combines the ability to bind documents with 4:1 pitch coil and 3:1 pitch wire which are two of the most popular and elegant binding styles used by organizations around the world.
This is a great machine for small copy shop or professional organization that is looking to bind documents with several different binding styles without having to buy multiple binding machines.
However, this is still a manual binding machine and is not designed for high volume production environments. If you need to bind more than fifty documents per week you may benefit from a modular electric binding system.
Additionally, users who want to use the Duomac 431 for coil binding should really consider purchasing a coil inserter to help spin the coils onto their documents. An inserter will help to save time and can quickly pay for itself in most professional settings.
This review was written by Jeff McRitchie who is the director of marketing for Mybinding.com. Jeff has written more than three hundred articles and more than two hundred reviews on Binding Machines, Binding Supplies, Report Covers, 3-Ring Binders, Index Tabs, Laminators, Laminating Supplies, Paper Shredders and Paper Handling Equipment.