Manual punch for up to 20 sheets* at a time (2:1 rectangular wire & 4:1 round coil holes)
Integrated wire closer & includes crimping pliers
Heavy-duty, perfect for print shops, schools, and large offices
14" punching length with open throat & fully disengageable pins
Product Description
With the Akiles DuoMac 421 you can bind documents with both 4:1 pitch spiral coil and 2:1 pitch twin loop wire. The DuoMac 421 is the only combination machine of its kind. The unique design of the 421 includes a the ability to punch both a 4:1 pitch hole pattern for spiral coil binding and a 2:1 pitch hole pattern for twin loop wire binding up to 1-1/4". This gives you the ability to choose the look and feel of your coil bound books and presentations. Four to One pitch coil (4 holes per inch) is the standard pitch of spiral coil used for binding presentations, proposals and books. Normally, you would have to use two different binding machines to do the same tasks as the DuoMac 421. Now you can choose between these two great binding styles for all your reports and presentations and you can also save space, time and money.
Product Details
Two punching throats. One for 4:1 pitch spiral binding coils and one for 2:1 wire-o (rectangular 4 x 5.5mm).
Incorporated wire closer.
Three handle system. One for each punching throat and one for the wire closer.
All pins on both punching patterns are fully disengageable.
Side margin control to provide evenly centered holes.
Integrated wire hanger holds wire in-place for easy page hanging.
Open-ended 14" punching throats for longer pages.
Punches and binds for the full set of combs to 2", 3:1 pitch Wire-O wires to 9/16", and Spiral-O wires to 1".
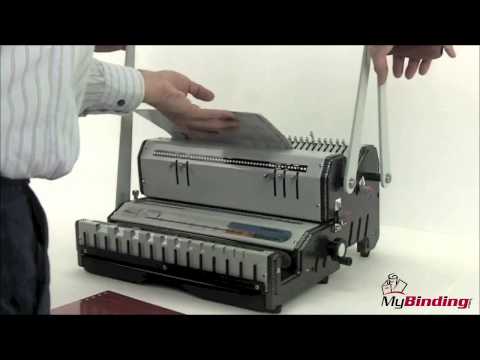
Welcome to MyBinding video. Today weš™re looking at the Akiles DuoMac 421, a 4:1 coil and 2:1 wire binding system. This heavy duty machine is designed to provide organizations the choice between three different styles of binding. Step-by-step, letš™s watch it in action.
This is 4:1 coil binding. With your project all ready to punch, set the side margin control knob to make sure that all punches are consistent throughout your project. Simply set it for the size paper you need and clamp down the dial. And pull out any of the disengageable die pins according to the size paper you have, so you have no half punches. Pull down on the long, more-forward arm and your holes are punched. Continue to punch through the rest of the pages in your project.
And now itš™s time to bind with your 4:1 pitch spiral coil binding. You can do so by hand or with a separate machine. And thatš™s basically it with 4:1 binding with the DuoMac 421. Thereš™s also an adjustable depth of margin punch control knob on the right hand side so you can punch a deeper, much more stronger margin, for a larger project.
This is punching and binding with 2:1 pitch twin loop wire. With your materials ready, slide them into the upper chamber, the open throat of the 2:1 punch. Use the side margin control knob to set the setting so that all punches are consistent throughout your project. Pull the disengageable die pin that you need for your size project to assure there are no half punches. Use the long arm in the back and make your punch. Continue to punch through the rest of the materials in your project until theyš™re all done. Thereš™s also an adjustable depth of margin punch control knob on the right hand side so you can punch a deeper, much more stronger margin for larger projects.
And with your punches made, itš™s time to bind. This punch pattern will also let you use 5:1 spiral coil binding spines. In wire binding, thereš™s a little trick where you can hide the seam of your final bind. Simply take the last page and flip it over so the back of the back faces the front of the front. There are two guides on the front of the DuoMac that help you choose the right size coil and make the right setting with the dial on the right hand side so the closer closes no more than needed. These are very important settings. Next, drape your wire over the wire fence in the front. And then thread your punched project over the teeth of the wire spine. This can be a bit tricky to do but with some practice, youš™ll become quite proficient. With all the teeth through all the wholes in the project, you are ready for closing. Remove the spine from the fence and turn it with the šœCš shape facing down into the closer flat along the bottom. Pull down with the arm until it stops and youš™re done. And because of our little trick at the beginning, the seam of the spine is hidden between the last page and the back cover. And itš™s that simple with the DuoMac 421 by Akiles. For more demos and reviews of this product and many more, check out MyBinding.com.
No issues, a little squaky imo but does a good job at punching holes and the wite binding feels very nice
B
Barb Rose
Love the machine I purchased! The only tiny complaint is that I didn't receive a shipping notice with tracking. I had to contact the company, but they sent it by email in just a few minutes. I would buy from this company again.
G
Grant Paxton
Works great! Thanks!
G
Great machine/ Great Company
Great machine/ Great Company
I’m so glad I found this machine!! It punches through my chipboard covers to make my journals. It seems very durable and well made. I Know it seems like a lot of money but, it’s well worth it. I’ve tried the other machines that are cheaper on Amazon and they just don’t do the job like this one does. You won’t be disappointed.
The Akiles DuoMac 421 is a combination binding system that offers medium volume users with three different binding styles. Here is a list of what we consider to be some of the strengths and weaknesses of the DuoMac 421.
Strengths:
All told, you can bind documents in three different styles with the DuoMac 421. First of all, using the 4:1 pitch punch, you can make books that utilizing standard four to one pitch spiral coil. The 2:1 pitch punch function allows for the corresponding twin loop wire, and you can also use it to bind thick books if you use 0.400 pitch spiral coils.
On the four to one side, you'll find a thirteen inch throat with a strategically-placed five disengageable pins. Depending on which pins you choose to disengage, you will be able to bid documents that are the more common letter and legal sized, as well as A4, A5, and half letter sized documents.
The two to one side is fourteen inches in length, and gives you the ability to disengage whichever punching pins you choose, meaning that you can punch documents up to fourteen inches in length.
Both of the DuoMac 421's punches feature open-throated designs which means that using a fairly easy two step process, you can punch documents of just about any size. In order to do that, all you will have to do is to punch one side of your stack, then flip it over and punch the other.
Akiles saw fit to include a really high-quality wire closer on the front of the DuoMac 421. With a lot of the other wire closers we have seen over the years, we've doubted their durability and have seen some of them start to lose accuracy over short periods of time. The high quality steel construction of these wire closers, however, left us impressed, and we see no reason why they shouldn't last a good many years.
Along those same lines, we have to say that we appreciated the fact that Akiles includes a pair of crimping pliers with the DuoMac 421. These pliers are essential to the process of spiral coils binding, and a thirty dollar value to boot, which is nothing to sneeze at.
Weaknesses:
One thing that we missed having on the DuoMac 421 is a spiral coil inserter. Spinning your coils onto you document by hand is no bid deal if you are only doing a few (and we mean a very few), but if you are going to be producing any sort of volume at all, you will need to look for a standalone coil inserter. Akiles recommends that the Roll @ Coil be purchased to go along with the DuoMac 421. It's not a very expensive addition, but it is something that you should be aware of.
Because it includes so many features, inexperienced users may be a little intimidated by the look and operation of the DuoMac 421. It's got handles and levers and buttons all over the place and looks perhaps a little bit like a misplaced octopus. You really won't have much trouble figuring it out, though, just be aware that it will just take a little bit of a learning curve.