To Get the Full Package, Order All of the Items Above The Rhin-O-Tuff 7700C4 is Rhin-O-Tuff's ultimate top-of-the-line mega-duty electric coil binding system, it can easily punch up to 35 sheets of 20# paper. The 7700C4 mega-duty electric coil binding system has everything you need to get up and running. The 7700C4 includes the HD7700 ultima modular punch, a 4:1 round coil die (.250 hole spacing - .172 hole diameter), a heavy-duty dual-powered electric coil inserter, and a modular mounting kit. Rhin-O-Tuff 7700C4 Coil Binding System is designed for high-volume commercial and corporate use, it can handle any project large or small. A great design feature of the mega duty 7700C4 is its future ability to be easily upgraded. Part Number 7700C4.
Product Details
Coil Die with easy disengageable pins - Included
Electric Coil Inserter- Included
Attachment kit for mounting Coil Inserter on top of punch - Included
Automatic and Manual Reverse feature to reduce jamming in the punch
Rate of 25 cycles per minute
Accu-Set adjustments on odd size paper
Efficient work environment with a standard foot pedal and optional versa switch
Extreme high capacity Waste Chip Tray with Clear View Access
Heavyweight metal construction
Made in the USAwith more than 98% recyclable materials
Rhin-O-Tuff Onyx HD 7700 Ultima Demo and Assembly Video
Transcript :
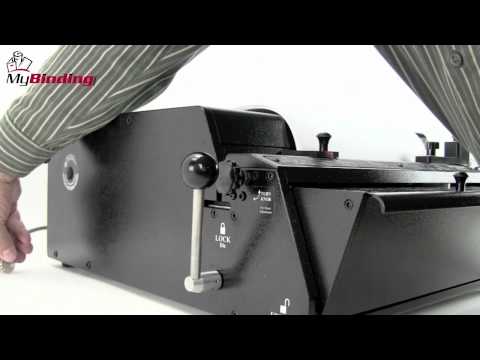
Welcome to the MyBinding video. This is the demo and assembly of the Onyx HD7700. This heavy-duty tabletop punch is the top-of-the-line punch solution for all your binding needs. Before we get to the assembly, let's watch a demonstration to see just how this machine works. First, you'll need to set the paper stop according to your project's needs. Twist the dial on the left side of the machine to fine-tune it to get exactly on the line that you need. With that all set, let's run our test paper. Slide it into the throat of the machine all the way to the left. Press the down on the palm switch or the foot pedal. A handy test at this point is to fold the paper in half, line up the corners, and see if the holes all line up. It should be centered with no half or missed holes. The solution to having holes is to remove the pin. All the pins are disengageable on around tough die. Simply pull the die out, find out which pin it is that you need to remove, open the carriage, remove the pin, replace the carriage, and you're all set. Pin removal is the same for all Rhin-O-Tuff dice. It's very simple. It's very quick. Lock your die back into place and let's punch again and we'll see how we'll do. This one looks perfect. And the fold test again and everything looks great. It's time to begin. With your project all in order and the way, you'd like it to be, process your whole project pack by pack of up to 55 sheets in a single punch. All Rhin-O-Tuff Onyx punches come with a patented auto-reverse feature keeping paper jams a thing of the past. However, it can happen if just too many sheets are put in at the same time. Stored on the back side of the machine is the small handle. This goes in on the left-hand side of the machine and fits right into the groove. Turn it counterclockwise or reverse the pins in the machine. Then you can remove your paper. If you need to, you can peer down just off the left side of the paper stock and you can actually watch the pins attract to make sure they're all gone before you remove your paper. The chip tray in the front is transparent so you can see right through to keep an eye on just how many chips are building up. That's the demonstration and how-to. And now for the assembly. Once you've removed your machine from the box, place it on a sturdy table and remove the plastic coating that protects the transparent cover of the chip tray. Inside the chip tray, you'll find all the parts of the assembly that you'll need. There's oil for lubrication, two handles to lock and unlock the die, a power cord, a palm switch, as well as the foot pedal. The first step is to install the two handles. Remove them from the bag and place them on either side. Screw them tight all the way down. These will serve as the lock and unlocking of the punch dice. The Onyx HD7700 comes with a foot pedal that plugs into the back of the machine and activates the punch. Also included with this machine is the palm switch. Some prefer it to the foot pedal. It plugs into the same place on the back of the machine and is activated either by the finger or by the palm. If you have purchased the optional versa switch, now would be a good time to install it. Simply remove the knob from the paper stop and take the stop itself off. Then replace it with a versa switch and screw with the same knob down. This switch plugs into the back of the machine in the same spot as the foot pedal for the palm switch. For the Onyx HD7700, the dice go in on the right-hand side. Place them in, and slide it all the way in until the black part is flushed with the machine. And then lock both handles on the right and left. There you go. You're all set. That's the demo on the assembly of the Onyx HD7700. You're on your way to a great many books. For more demos, reviews, and how-to's, check out MyBinding.com.