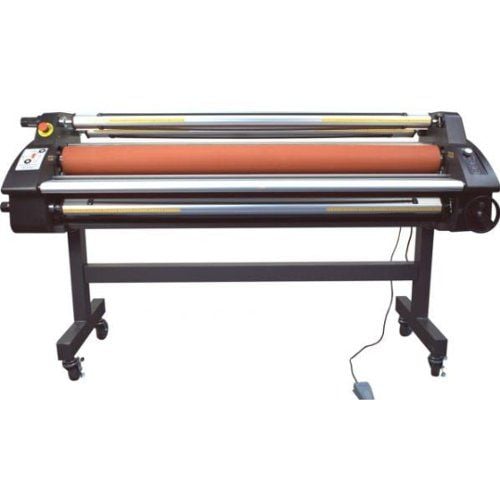
Royal Sovereign Sigmont 65H 64" Heat Assist Cold Roll Laminator
FAQ: 0 Questions, 0 Answers
0 Q&As
Item# SIGMONT-65H
- High Grade Silicone Rollers for Consistent Lamination.
- Three rear slitters for print separation
- Max Lamination Speed (fpm): 49.2'
- Roller Diameter: 5.125" (130mm)
ProductDescription
The Royal Sovereign Sigmont 65H is the new generation heat-assist roll laminator. With a cutting edge features such as 49.2ft/min laminating speed, high-grade silicon rollers for consistent lamination, 64" laminating width,and a maximum temperature of 140F, the Sigmont 65H is truly in a class of its own. Other great features include three rear slitters for print separation, 5.125" roller diameter, integrated rear media rewinder, and front facing roller nip adjustment crank. This Royal Sovereign Sigmont 65H 64" Heat Assist Roll Laminator comes with a foot pedal and rear remote, and is backed by a 1-year Manufacturer's Warranty.
Product Details
- High Grade Silicone Rollers for Consistent Lamination.
- Three rear slitters for print separation
- Maximum top roller temperature of 140F
- Larger roller diameter of 5.125"
- Front Facing Roller Nip Adjustment Crank.
- Maximum Lamination Speed of 49 ft/min.
- Foot Pedal and Rear Remote Included.
- Integrated Rear Material Rewinder.
- Shaft Bar Roll Media Centering Guides .
- Fully Assembled, just Roll and Go!
Item Specifications
- Max Lamination Width: 64"
- Max Lamination Speed (fpm): 49.2'
- Main Rollers: High Grade Silicone
- Roller Diameter: 5.125" (130mm)
- Heating Method: Top Roller Heat Assist
- Max Material Diameter: 6"
- Max Temperature: 140F (Three Presets)
- Film Core: 3" Auto Grip
- Max Roller Nip: 1"
- Foot Pedal: Yes
- Rear Remote: Yes
- Integrated Rear Rewinder: Yes
- Reverse: Yes
- Rear Slitters: Yes (3)
- Power Consumption: 1600 W
- Unit Dimensions (W x D x H): 83" x 24.5" x 48.5"
- Unit Weight: 419 lbs.
- Shipping Dimensions (W x D x H): 86" x 29.5" x 55"
- Shipping Weight: 710 lbs.
- Manufacturer's Warranty: 1 Year Limited Manufacturer's Warranty
Demonstration Video

Roya Sovereign Sigmont 65H Webbing & Lamination Video
Transcript :
SIGMONT 65H. Webbing and Lamination. Step 1. Insert roll material on bottom supply shaft. Step 2. Insert laminate on top supply shaft. Step 3. Prepare laminator with starter paper and laminating material. Step 4. Score laminate backer and separate. Step 5. Apply double stick tape to take-up core and attach release line to tape. Step 6. Pull material over the idle bar and feed into the rollers then run laminator. Step 7. After the material exits the back of the laminator, tape to rear rewinder.

Roya Sovereign Sigmont 65H Setup Demo
Transcript :
SIGMONT 65H Setup. Cut the straps with a pair of scissors. Battery operated drill with 5/16” or 8mm socket end. Remove document guide package and spare silicon elastics, owner’s manual (CD), dust cover. Remove heating elements. Remove bridge. Remove bottom holding structure. Set the lock caster in lock position. Lift up the machine from both ends. Put the machine down from the holding structure. Remove right bottom structure with a flat pry bar and a hammer. Bend down the nails for your safety. Put the bridge right side of the crate. Set the lock caster off. Slowly move the machine. Remove the ...
SIGMONT 65H Setup. Cut the straps with a pair of scissors. Battery operated drill with 5/16” or 8mm socket end. Remove document guide package and spare silicon elastics, owner’s manual (CD), dust cover. Remove heating elements. Remove bridge. Remove bottom holding structure. Set the lock caster in lock position. Lift up the machine from both ends. Put the machine down from the holding structure. Remove right bottom structure with a flat pry bar and a hammer. Bend down the nails for your safety. Put the bridge right side of the crate. Set the lock caster off. Slowly move the machine. Remove the protective covers. Install the media guide. Place the foot switch in front of the machine. Connect the power

Roya Sovereign Sigmont 65H 360 Video
Transcript :
SIGMONT 65H 360.


