Durable all-metal construction ensures long-lasting performance for high-volume binding tasks.
Efficient coil insertion with an inserting table, reducing binding time and enhancing productivity.
Versatile binding capacity of up to 25mm, compatible with a wide range of 4:1 pitch spiral coils.
Includes a waste basket for easy cleanup, keeping your workspace organized and tidy.
Product Description
The Akiles CoilMac M Manual Spiral Coil Binding Machine is perfect for users who are looking for an all metal sturdy coil binding machine but don't feel that an electric coil inserter is necessary or already have a stand alone inserter. The Akiles CoilMac M is an excellent coil binding machine which is built to last. Akiles CoilMac renders efficiency and productivity. Its high quality components and full range of functions make it the most complete and durable equipment in its class, ideal for higher volume binderies and copy centers.
Product Details
Die Disengagement Pins: For a clean punch with multiple paper sizes.
Punching Margin Control: Provides the correct punch-margin-depth for each coil size and maximizes the document's tear resistance.
Side Margin Control: Provides an evenly centered punch for all document sizes.
Coil Selector
Open Punching Throat and Continuous Punching Guide
Waste Basket
Inserting Table: Expedites the inserting of the coil; reducing costs and binding time.
Includes: Waste drawer, spiral coil selector.
Punches 4:1 .250 Pitch (43 Hole) Pattern
Optional: Spiral Coil Pliers.
Manufacturer's Warranty: 1 Year Manufacturer's Warranty
Specifications
Model: CoilMac-41
Pitch: 4:1
Punching Length: 13" (53 dies)
Inserting: Manual
Hole Punch: Round (4mm radius)
Disengaging Dies: 5
Single Punching Capacity: Up to 20 sheets (20 lbs paper)
Binding Capacity: 25mm
Weight / Volume: 35 lbs / 2.50 CbFt
Manufacturer's Warranty: 1 Year Manufacturer Manufacturer's Warranty
Akiles Coilmac M Manual Binding Machine Demo Video
Transcript :
Welcome to MyBinding video. This video looks at the CoilMac M, a manual coil binding machine by Akiles. Solid, simple, and versatile, the CoilMac M could be an economical choice for great coil binding. Letš™s watch it work.
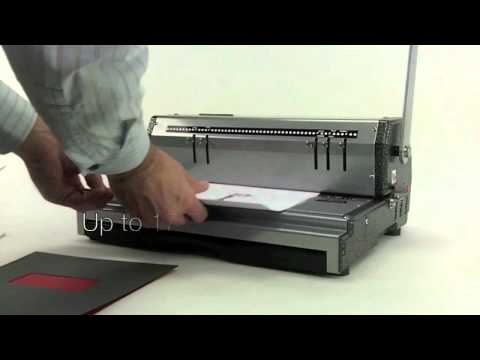
Set the side margin control knob so that all punches will be consistent throughout your entire project. There are several disengageable die pins for a clean punch on standard sized documents. This way you have no half holes. And make your punch. The punching margin control knob provides the correct punch margin depth for each coil size. When youš™re all set, begin with the covers. Spine end in first, make your punch. And continue to punch through the rest of your project, up to 17 sheets of 20lb paper per punch. When all punched, assemble your project; itš™s time to bind.
The CoilMac M comes with a coil inserting table. This expedites the inserting of coils. There are two pieces to assemble; weš™ll call them the fence and the teeth. This is the fence. Place the blue piece down and twist it tight with the knob. Second, place the teeth down. Remove the small nut from that twist knob, find it underneath the machine, line it in place, and screw it down tight as well. Turn the whole unit around and snap it right onto the end of the machine. Thread one end onto the teeth on the table and use the other end to begin your coil. Once youš™ve got that started, you can use one or both hands to move it along much faster using the groove. Lift your project from the holder and twist to the end. Crimp both ends of your project with coil crimping pliers. And we have a how to video of this on our website if you need it. Thatš™s it. Itš™s that simple to bind a great-looking book with the CoilMac 41 M. For more demos, reviews, and how toš™s on this product and many more, check out MyBinding.com.
Very sturdy product works as described! I would reccomend!
S
School Graphics Teacher
Very sturdy product works as described! I would reccomend!
L
Lisa Steinmetz
Great for schools
We love this machine. It punches and binds all of our students work cleanly and easily.
L
Lisa Steinmetz
Great for schools
We love this machine. It punches and binds all of our students work cleanly and easily.
A
Anonymous
Great Investment
I am so glad I finally made the decision to buy a coil binder, because I had been toying with the idea for months and decided that after spending a couple hundred bucks at kinkos, I wanted to give doing our client presentations myself a chance. I've only had the machine for a couple months, but it has already almost paid for itself through the savings of outsourcing the binding. The difference in quality compared to more affordable machines was obvious even before I actually used it... it's sturdy and even looks pretty good (it isn't even that big). You'll have to buy the coils separately.
A very popular and heavy duty spiral coil binding machine, the Akiles CoilMac M is aimed at small or medium sized businesses and organizations who want the ability to create their own booklets using ColorCoil. In the following brief review/overview, we will take a look at the various features of this machine and give you what we consider to be some of its strengths and weaknesses.
Strengths:
The first thing we noticed and appreciated about this machine is that it's built like the proverbial tank. That is no surprise for an Akiles machine, but we found that the CoilMac M was of especially high quality construction. The body and all of the major components are made of metal, and we see no reason why this machine wouldn't last you for years without the need for repair or maintenance.
The four to one pitch ratio that the CoilMac M features is one of the more versatile pitches on the spiral coil binding world. With this ratio, you will be able to bind a range of documents from six millimeters (about a quarter inch) to as large as fifty millimeters (two inches). You will want to get some experience under your belt, however, before you attempt to bind books that are larger than one inch. Still, it is important to keep in mind that supplies for spiral coil binding in these size ranges are easy to find, and are available in somewhere approaching sixty colors, so you can hardly find a more versatile binding system to work with.
At 17 pages per lift, the CoilMac M has a pretty decent punching capacity for a medium-use machine of this type.
The CoilMac M includes five disengageable dies that allow for the punching of all of the most common sized of paper, from letter, to legal, to A4 and A5.
Weaknesses:
Though there is an inserting table that makes hand insertion of the coils a little bit easier, you should be aware that there is no electric coil inserter included on the CoilMac M. The binding process goes much more quickly with electric inserters, so if you think that you will need one, you'll have to take a look at either purchasing a standalone unit, or stepping up to the CoilMac ECI.
Because they are so important to finishing the binding process, we were a little disappointed to find that the CoilMac M does not come with crimping pliers. You will find that cutting and crimping the end of your coils is near impossible without them, and inexperienced users especially should be made aware of this fact. All in all, it is only about a thirty dollar value that is missing from the machine, but make sure that you order a pair of these pliers when you order the CoilMac M.
Though, as we mentioned above, the CoilMac M has some disengageable dies that will get you through the vast majority of jobs, the fact that they are not all disengageable will make it unlikely that you will be able to effectively process documents that are of irregular or custom size. For most users, this won't be a problem. We just thought you should know.