MyBinding Knowledge Base
- Binding (248 Article)
- General Binding (42)
- Plastic Comb Binding (57)
- Fastback Binding (59)
- Perfect Binding (2)
- Modular Punching (8)
- Zipbind (3)
- Twin Loop Wire (13)
- Coil Binding (22)
- Thermal Binding (14)
- Strip Binding (1)
- VeloBind (4)
- Binding Covers (14)
- Proclick Binding (10)
- SureBind (4)
- Screw Post (2)
- Hole Punches (2)
- Staplers (4)
- Komtrak Insprial Binding (2)
- Paper (1)
- Rhin-O-Tuff (5)
- Binding Machines Comparison (17)
- Laminating (109 Article)
- General Laminating (26)
- Roll Lamination (16)
- Pouch Lamination (36)
- Pouch Board Laminator (3)
- School Laminator (3)
- Foil Laminating (3)
- Royal Sovereign Laminators (10)
- Laminators Comparison (3)
- Boards (11 Article)
- Bulletin Boards (3)
- Whiteboards (5)
- Chalkboards (1)
- Paper Shredders (44 Article)
- General Shredding (35)
- Industrial Shredders (1)
- Cross-Cut Shredders (2)
- Cardboard Shredders (1)
- Multimedia Shredders (1)
- Personal Shredders (1)
- High Security Shredders (2)
- Ring Binders (9 Article)
- Specialty Binders (2)
- Reinforced Paper (1)
- Health Care Punched Paper (1)
- Perforated Paper (2)
- View Binders (1)
- Index Tabs (9 Article)
- Index Tab Dividers (2)
- Copier Tabs (4)
- Pocket Folders (1)
- Custom Index Tabs (1)
- Pre-Printed Index Tabs (1)
- Paper Handling (37 Article)
- Paper Folders (9)
- Paper Joggers (2)
- Guillotine Cutters (4)
- Rotary Trimmer (3)
- Electronic Paper Cutters (1)
- Corner Rounders (2)
- Paper Scoring (2)
- Paper Drill (2)
- Booklet Makers (3)
- Stack Cutters (1)
- Paper Handling Equipment Comparison (5)
- ID Accessories (12 Article)
- Badge Holder (1)
- Lanyards (8)
- Badge Reels (1)
receive
$5off
*On order $25 or more.
How do I bind a document using spiral coil binding?
Spiral coil binding (also known as Color coil or plastic coil binding) is one of the most popular and fastest growing of all coil binding styles. Documents bound with spiral coils lay flat and the pages can turn 360 degrees around the flexible PVC coil spine. Coil binding is fast and easy and offers a wide variety of colors to choose from.
- Select the proper size of color coil binding element
- As with other coil binding styles, your provider of coil bindings should be able to give you suggestions for the appropriate size of coil binding to match your document.
- It is important to not use a coil binding that is too small for your document as production time, appearance, and the functionality of the document will be greatly affected.
- Appearance is always a good indicator of the fit of the coil binding.
- Coil binding is also available in a variety of pitches; make sure to match your coil binding to your punch.
- Most common pitch for coil binding is 4:1 (or 4 holes per inch)
- Also available is 5:1 and 6mm, 3:1 is a much less common size
-
Starting the Color Coil Binding
- Many coil binding machines have a spine forming channel, this is a useful feature to help create the contours of the coil binding and aid in the initial insertion of the coil binding
- Begin to spin the coil binding onto the punched document by hand. It is a good idea to spin the coil binding on at least an inch.
- After the coil binding is started, hold the coil binding by the rubber rollers. Apply gentle pressure to the coil binding against the roller.
-
Crimping the coil binding element
- When the coil binding is spun onto the document, the excess coil binding needs to be cut and crimped using coil binding cut and crimp pliers.
- When using the cut/crimp pliers, always use them in your right hand with your thumb next to the red dot.
- Make sure that the prongs on the cut/crimp pliers are in contact with the coil binding and squeeze.
- This will cut of the excess coil binding and fold the coil binding over to keep it from uncoiling.
-
Coil binding not inserting into document
- Make sure that the pitch of the coil binding matches the pitch of the holes.
- Coil binding too small for document.
- Large diameter coil bindings (such as 1 ¼” and above) are difficult to insert in the best of conditions. Try an oval hole punch.
-
Coil binding not folding over when cut
- Make sure that the coil bindings are in your right hand with the dot facing up. If not, the pliers will cut and crimp the section of coil binding that you want to cut off!
- Make sure that both of the prongs of the cut/crimp pliers make contact with the coil binding. This can be somewhat difficult on 6mm and 7mm coil bindings due to the small diameter.
- Auto cutter/crimpers are available in single or double configurations. They can be tedious to set up, but save a lot of time for longer production runs.
- If possible, do not use coil bindings for documents over 1 ¼” thick. The document does not function the way that coil binding is intended to. The increased thickness of the coil binding and the weight of the book cause the pages not turn as freely.
- Another common configuration of a coil binding inserter is a wheel. The wheel can be faster for experienced users, but it is more difficult to learn. Smaller volume users typically have more success with the roller style of inserter.
- Coil binding is sold by the inch, so it is possible to get coil binding in 9” lengths for top spines and eliminate waste, or 18” lengths for 11 x 17 documents. Coil binding is the best method of binding when you have non-standard spine size needs.
- Coil binding is available in over 60 colors, by far the most of any binding style.
Here is a transcript of this video:
Welcome to MyBinding How To videos. Today we're answering the question how to spiral bind. Spiral binding, as it's commonly known, is actually referred to as coil binding in the binding industry. And that is simply taking papers and a cover, a spiral shaped bind, or a coil bind, and putting them all together for a great looking presentation. As you would imagine, there are many coil binding machines and systems on the market today. We'll use the iCoil 41 by Akiles to do a demonstration step-by-step of how to bind a book with a spiral, or a coil, bind. We picked this small scale machine to use because it contains all the steps of the process of coil binding, including an electronic coil inserter. The first step is to take the covers of your project, put the side that's to be punched into the punching throat of the machine on the back side. Here's where you adjust the side margin control to set the machine so that all punches are consistent throughout your entire project. And you make your punch by pulling the lever down. Some punching machines are electronic in this feature. Next, you punch through all the sheets of your project. You'll do this in smaller batches and according to the punch capacity of the machine you're working with. Once you've punched through all your sheets, assemble your book in order. Now it's time to bind. This is where you need to choose the right size coil or spiral bind for your project. Many of the coil binding machines on the market have very useful measuring tools built into the machine so that you can decide what is the right size coil for your size project. The binding process is generally begun by hand by threading or twisting the spiral bind through the first few holes of your book. And you'll continue to thread the bind of your book with the coil either by hand, or by an electronic coil inserter. As you could imagine, this feature is pretty handy and makes things much faster. The finishing touch with coil binding is used with coil crimping pliers. With a simple squeeze, the end of the coil is snipped off and the end is twisted in for a great looking finish. And there it is, the basics of how to spiral bind. For more articles, how to's, demos, and reviews on all things binding, check out MyBinding.com.
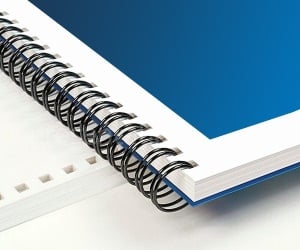
< Over the years, a number of customers have asked me whether they can use twin loop wire with their plastic comb binding machine. These customers often don’t want to have to buy a brand new machine but like the look and feel of twin loop wire binding. However, the answer to their question isn’t as simple as it seems. You see, they actually do make twin loop wire that is designed to work with the plastic comb binding hole pattern. With that said, if you want to use these wires you are going to need a way to close the wires. What is Spiral-O Wire? Let me explain a little bit more…There is a product that we carry called Spiral-O Wire. This wire has 19 loops and is designed to work with the hole pattern from a plastic comb binding machine. Spiral-O Wire is sometimes called Wire Combs or Ibico Wire and was originally designed for use with some of the older Ibico binding machines. A number of the older Ibico plastic comb binding machines also included a twin loop wire closer on the front of them to allow users to use both plastic combs and wire. This 19 loop wire was designed for this purpose. What Equipment is Needed? As the Ibico brand has been phased out by GBC and all of the older Ibico plastic binding machines have been replaced with new models, they no longer have the twin loop wire closer on the front of them. This presents a problem in trying to use these spiral-o wires since you can’t use the wires without a way to close them. One of the only options left is to purchase a Twin Loop wire closer. However, since twin loop wire closers are not incredibly cheap this option usually only appeals to users who have larger electric plastic comb binding machines. Otherwise, it is often advisable to simply buy a low end 3:1 pitch twin loop wire binding machine (the supplies are cheaper). This being said, if you have one of the older Ibico binding machines that has a wire closer included you are in luck. The Spiral-O binding supplies that we carry will work perfectly with your machine and you will be able to use both plastic combs and wire depending on your needs. These Spiral-O binding supplies are available in Black, Silver, White, Blue and Red and in sizes up to 1″ in diameter. If you aren’t sure what type of wire binding supplies that you need to work with your machine simply give us a call. Our trained sales representatives will be glad to help you find the correct supplies for use with your machine.(Read More)

Loading...


